LinkShare rotating banner
Showing posts with label how-to. Show all posts

Sunday, April 4, 2010

윈도용 MPlayer / Mencoder 사용 및 설정

MinGW로 컴파일한 MPlayer를 시험해 보고 최적으로 설정해 보자. 다음은 내가 컴파일한 MPlayer와 Mencoder이다. bzip2.exe로 압축을 풀어야 한다(bzip2 -d mplayer.exe.bz2).


  1. DirectX 8.1 설치(Windows 95/98/ME Only)


    업데이트: Windows 98/ME 사용자도 아래의 DirectX 9.0c를 설치할 수 있다. 만일 DirectX 9을 설치할 경우, DirectX 8.1을 설치할 필요가 없게 된다.


    Windows 98/ME 사용자는 DirectX 8.0a, DirectX 8.1b 혹은 DirectX 8.2를 받아서 설치해야 MPlayer가 제대로 작동한다. 다음은 다운로드 링크를 여러 군데 모은 것이다.


    DirectX 8.1는 Windows XP에 포함되어 있다.


  2. DirectX 9.0c 설치


    MPlayer의 최신 개발 코드는 기본적으로 DirectX 9와 링크되도록 되어 있다. 그러므로 이렇게 만든 mplayer.exe 실행 파일을 Windows 98/ME/XP에서 실행하면 DirectX 9를 못 찾고 오류가 발생할 수가 있다. 이러한 오류를 방지하기 위해 MPlayer를 configure 할 때 --disable-direct3d 옵션을 주어서 DX9 링크 못하게 할 수 있다. 그렇지 않으면 filehippo.com에서 DirectX 9.0c 2006년 12월 릴리스를 받아서 설치해야 한다.


  3. MPlayer의 간단한 명령행 도움말


    mplayer.exe를 처음 실행하면 검은 콘솔 창이 나타나 아래처럼 짧은 도움말이 나온다.


    MPlayer SVN-r29464-snapshot-3.4.5 (C) 2000-2009 MPlayer Team
    Usage: mplayer [options] [url|path/]filename

    Basic options: (complete list in the man page)
    -vo select video output driver ('-vo help' for a list)
    -ao select audio output driver ('-ao help' for a list)
    vcd:// play (S)VCD (Super Video CD) track (raw device, no mount)
    dvd:// play DVD title from device instead of plain file
    -alang/-slang select DVD audio/subtitle language (by 2-char country code)
    -ss seek to given (seconds or hh:mm:ss) position
    -nosound do not play sound
    -fs fullscreen playback (or -vm, -zoom, details in the man page)
    -x -y set display resolution (for use with -vm or -zoom)
    -sub specify subtitle file to use (also see -subfps, -subdelay)
    -playlist specify playlist file
    -vid x -aid y select video (x) and audio (y) stream to play
    -fps x -srate y change video (x fps) and audio (y Hz) rate
    -pp enable postprocessing filter (details in the man page)
    -framedrop enable frame dropping (for slow machines)

    Basic keys: (complete list in the man page, also check input.conf)
    <- or -> seek backward/forward 10 seconds
    down or up seek backward/forward 1 minute
    pgdown or pgup seek backward/forward 10 minutes
    < or > step backward/forward in playlist
    p or SPACE pause movie (press any key to continue)
    q or ESC stop playing and quit program
    + or - adjust audio delay by +/- 0.1 second
    o cycle OSD mode: none / seekbar / seekbar + timer
    * or / increase or decrease PCM volume
    x or z adjust subtitle delay by +/- 0.1 second
    r or t adjust subtitle position up/down, also see -vf expand

    * * * SEE THE MAN PAGE FOR DETAILS, FURTHER (ADVANCED) OPTIONS AND KEYS * * *


    mplayer -vo help 명령은 다음과 같이 어떤 화면 출력 장치가 사용 가능한지 보여 준다.


    MPlayer SVN-r29464-snapshot-3.4.5 (C) 2000-2009 MPlayer Team
    Available video output drivers:
    directx Directx DDraw YUV/RGB/BGR renderer
    direct3d Direct3D 9 Renderer
    gl X11 (OpenGL)
    gl2 X11 (OpenGL) - multiple textures version
    winvidix WIN32 (VIDIX)
    cvidix console VIDIX
    null Null video output
    mpegpes MPEG-PES file
    yuv4mpeg yuv4mpeg output for mjpegtools
    png PNG file
    jpeg JPEG file
    gif89a animated GIF output
    tga Targa output
    pnm PPM/PGM/PGMYUV file
    md5sum md5sum of each frame

    mplayer -ao help 명령은 어떤 음향 출력 장치가 사용 가능한지 보여 준다.


    MPlayer SVN-r29464-snapshot-3.4.5 (C) 2000-2009 MPlayer Team
    Available audio output drivers:
    dsound Windows DirectSound audio output
    win32 Windows waveOut audio output
    mpegpes MPEG-PES audio output
    null Null audio output
    pcm RAW PCM/WAVE file writer audio output


  4. MPlayer 시험


    일단 명령 프롬프트(cmd.exe)나 실행 대화창(Run...)에서 다음과 같은 명령을 입력하여 MPlayer를 테스트해 보자. 위에 보이는 -vo 도움말과 -ao 도움말을 참고하여 자신의 시스템에 가장 알맞은 옵션을 찾아 보자.


    mplayer -vo direct3d -ao dsound -font C:\WINDOWS\FONTS\Tahoma.ttf -framedrop mymoviefile.avi

    또는 좀 느리지만 기본적인 출력 장치로 GL과 win32를 사용해 볼 수 있다.


    mplayer -vo gl -ao win32 Bear.wmv

    샘플 동영상 파일은 인터넷에서 검색하여 받도록 한다. Vista와 Windows 7 사용자는 C:\Users\Public\Videos\Sample Videos 폴더에 있는 샘플 동영상 파일로 MPlayer를 테스트해 볼 수 있다.


  5. MPlayer 설정


    처음으로 MPlayer를 실행하기 전에 HOME 환경변수를 정하여 자신의 폴더를 정해 준다. 그리고 MPlayer를 처음으로 더블클릭하면 사용자의 %HOME% 디렉토리에 “mplayer”라는 폴더가 생기고 그 안에 "config"라는 파일이 있다. "config" 파일에 다음과 같이 설정 사항을 적는다:


    # Write your default config options here!
    cdrom-device=D:
    dvd-device=D:
    ao=dsound
    vo=direct3d
    font=C:\WINDOWS\FONTS\MALGUN.TTF
    framedrop=yes
    subcp=cp949

    Windows 98/ME 사용자는 화면 출력 장치 설정으로 vo=direct3d 대신에 vo=directx 또는 vo=directx:noaccel 라고 적어야 한다. directx:noaccel은 가속 기능이 없는 DirectDraw 출력 장치인데 화면 출력에 문제가 있을 경우에 사용한다.


  6. MPlayer 코덱


    MPlayer 코덱을 받는 게 좋다. 파일 이름은 windows-essential-20071007.zip이다. 압축을 풀면 "windows-essential-20071007" 폴더가 나오는데 "codecs"으로 이름을 바꾸어 mplayer.exe가 있는 폴더로 옮기도록 한다.


    또한, MPlayer 소스의 etc 디렉토리에 codecs.conf 파일이 있을 것이다. 이것을 사용자의 mplayer 폴더에 복사해 놓는다. 그리고 mplayer를 실행하면 메시지 첫머리에 다음과 같이 코덱 숫자가 표시된다.


    MPlayer SVN-r29464-snapshot-3.4.5 (C) 2000-2009 MPlayer Team
    138 audio & 299 video codecs
    Usage: mplayer [options] [url|path/]filename

    이제 다음 명령어를 실행하면 mplayer 코덱에 관한 정보가 나올 것이다.


    mplayer -vc help
    mplayer -ac help


  7. 다음처럼 동영상을 볼 수 있다:

    mplayer mymoviefile.avi > C:\Windows\Temp\error.txt

    이제 남은 일은 SMPlayer를 받아서 MPlayer 인터페이스로 설정하는 것이다.


Thursday, April 1, 2010

윈도용 MPlayer와 Mencoder 정적 컴파일

Windows에서 MPlayer/Mencoder를 컴파일하려면 MinGW 컴파일러가 필요하다. 이 글을 읽고 MinGW를 설치하도록 한다. 이 글은 정적 실행 파일(특별한 DLL에 의존하지 않는 단일 프로그램)을 생성하기 위해 쓰여졌다. 동적 실행 파일을 만들려면 이 글을 읽기 바란다.


시작 메뉴에서 MSYS (rxvt)를 오른쪽 클릭하여 관리자로 실행한다. Windows Vista와 Windows 7에서 문제 없이 컴파일하기 위함이다.


  1. LZO 라이브러리는 빠른 압축 기능으로 순수 비디오를 압축하는 데 쓰인다.

    tar xzvf lzo-2.03.tar.gz
    cd lzo-2.03
    ./configure --prefix=/mingw
    make
    make install

  2. Zlib는 압축 헤더가 붙은 몇몇 mov 파일을 보기 위해 필요하다. zlib.net에서 소스를 받아 컴파일한다:

    cd ~

    tar xjvf zlib-1.2.4.tar.bz2

    cd zlib-1.2.4

    ./configure --prefix=/mingw

    make

    make install


  3. PNG 이미지 라이브러리


    영화 보는 데 PNG 라이브러리가 왜 필요한지 궁금할 것이다. 가끔 영화의 인상적인 부분을 한 장면 한 장면 사진으로 저장하고 싶을 때 쓸 수 있다. PNG 라이브러리 소스를 받아 컴파일하자:


    cd ~
    tar xzvf libpng-1.4.1.tar.gz
    cd libpng-1.4.1/
    ./configure --prefix=/mingw --disable-shared
    make
    make install


  4. Freetype 및 Iconv 라이브러리


    Freetype은 자막 표시에 필요하다. iconv 라이브러리에 의존하므로 먼저 iconv 소스를 받아 컴파일하자:


    cd ~

    tar xvzf libiconv-1.13.1.tar.gz

    cd libiconv-1.13.1

    ./configure --prefix=/mingw --disable-shared

    make

    make install

    그런 다음, Freetype2를 받아 컴파일한다:


    cd ~

    tar xzvf freetype-2.3.12.tar.gz

    cd freetype-2.3.12

    ./configure --prefix=/mingw --disable-shared

    make

    make install


  5. Fontconfig 라이브러리는 SSA 자막 표시에 필요하다. expat 라이브러리에 의존하므로 먼저 expat 라이브러리를 컴파일하자.

    cd ~
    tar xzvf expat-2.0.1.tar.gz
    cd expat-2.0.1/
    ./configure --prefix=/mingw --disable-shared
    make install

    그리고 fontconfig 라이브러리를 컴파일한다.

    cd
    tar xzvf fontconfig-2.8.0.tar.gz
    cd fontconfig-2.8.0/
    ./configure --prefix=/mingw --disable-shared
    make install


  6. Libcdio 소스를 여기서 받아 컴파일하고 설치하자.

    tar xzvf libcdio-0.81.tar.gz

    cd libcdio-0.81

    ./configure --prefix=/mingw --disable-shared

    make

    make install


  7. Libogg, Libvorbis, speex, Theora 컴파일


    libogg, libvorbis, speex 그리고 theora 라이브러리 모두 xiph.org에서 받아 다음과 같이 컴파일하자:


    ./configure --prefix=/mingw --disable-shared

    make

    make install


  8. DirectX 헤더를 아래의 위치에서 받아서:


    MinGW의 include 폴더(예를 들어, C:\MinGW\include)에 압축을 푼다.


  9. MPlayer 정적 컴파일을 위한 configure 명령


    pkg-config.exe와 yasm.exe를 받아서 /mingw/bin에 저장한다. MPlayer 소스를 받아서 풀자:


    tar xjvf mplayer-export-snapshot.tar.bz2
    cd mplayer-export-2009-08-02/

    다음과 같이 configure 명령어를 입력한다.


    ./configure --prefix=/mingw --enable-runtime-cpudetection --enable-static --enable-theora --disable-vidix --yasm=/mingw/bin/yasm


  10. configure가 끝나면 config.mak를 열어서 손보자. MPlayer.exe를 실행할 때 검은 로그 창이 나타나는 현상을 원하지 않는다면 EXTRALIBS_MPLAYER= 행에 -mwindows 추가하도록 한다:

    EXTRALIBS_MPLAYER =  -mwindows -lopengl32 -lgdi32 -lwinmm -ld3d9 -lfaac -lx264 -lmp3lame


  11. MPlayer/Mencoder 컴파일


    드디어 MPlayer 컴파일을 시작한다.


    make

    컴파일이 성공적으로 끝나면 mplayer.exe 그리고 mencoder.exe 두 개의 파일이 생긴다. strip 명령을 쓰면 실행 파일의 크기를 약간 줄일 수 있다.


    strip m*.exe

    UPX로 압축한다.


    upx --best --strip-relocs=0 mplayer.exe
    upx --best --strip-relocs=0 mencder.exe

    가령, C:\Program Files로 복사하도록 한다.


    cp -iv m*.exe /c/Program\ Files


mplayer.exe와 mencoder.exe 두 개의 실행 파일이 성공적으로 만들어졌으니, 이제 MPlayer를 테스트하고 설정하는 일이 남았다.

Monday, June 8, 2009

Compiling Mencoder for Windows

Mencoder is a command-line tool for creating multimedia files. It allows you to convert video from one format to another. When used together with OGMRip, mencoder helps you to rip DVD into a video file that's convenient to watch on computers. Note that the instruction herein explains how to compile Mencoder for the Windows platform, not Linux.


MinGW must be installed first (Look here for how). Once you have MinGW, launch MSYS (rxvt) from the Start menu and type the following commands.


  1. PNG and JPEG


    PNG depends on zlib compression library. Download the zlib source from zlib.net and compile as follows:

    tar xzvf zlib-1.2.3.tar.gz
    cd zlib-1.2.3
    ./configure --prefix=/mingw
    make
    make install

    Now get the PNG library here and compile it as follows:

    tar xzvf libpng-1.2.34.tar.gz
    cd libpng-1.2.34/
    ./configure --prefix=/mingw --disable-shared
    make
    make install

    Download the source for JPEG library, compile and install JPEG as follows:

    tar xzvf jpegsrc.v7.tar.gz
    cd jpeg-7
    ./configure --prefix=/mingw
    make
    make install


  2. libdca Library


    Download the libdca source from videolan.org and compile it like this:


    tar xjvf libdca-0.0.5.tar.bz2
    cd libdca-0.0.5
    ./configure --prefix=/mingw
    make
    make install


  3. OGG, Vorbis and Theora


    The source for these libraries can be obtained from xiph.org. Compile them like this:

    ./configure --prefix=/mingw --disable-shared
    make
    make install


  4. Libcdio Library


    Download the libcdio source from here. Compile and install libcdio as follows:

    tar xzvf libcdio-0.81.tar.gz
    cd libcdio-0.81
    ./configure --prefix=/mingw --disable-shared
    make
    make install


  5. Live555 library


    The Live555 library is used to decode streaming media. Get the live555 source from here and compile it as follows:

    cd /mingw/lib
    tar xzvf live.2009.07.28.tar.gz
    cd live
    ./genMakefiles mingw
    make


  6. LAME


    LAME is an MP3 encoder. This library allows Mencoder to encode DVD sound into MP3 audio. Download LAME from lame.sf.net and compile it as follows.


    ./configure --prefix=/mingw --enable-expopt=full

    make

    make install


  7. TwoLame


    TwoLAME is an MP2 audio encoder. Get the source from twolame.org and compile it:

    ./configure --prefix=/mingw CPPFLAGS='-DLIBTWOLAME_STATIC'
    make
    make install


  8. XviD


    In case you didn't know, XviD is the most popular video encoder used in creating movie files found on the P2P networks. With this library, mencoder can rip a DVD into XviD video. Get the XviD source from xvid.org and compile as follows:


    tar xzvf xvidcore-1.2.2.tar.gz

    cd xvidcore/build/generic

    ./configure --prefix=/mingw

    make

    make install

    In addition, change to the /mingw/bin directory and copy xvidcore.a to libxvidcore.a.


    cd /mingw/lib

    cp xvidcore.a libxvidcore.a


  9. FAAC


    FAAC is an MPEG-4 AAC audio encoder. Get the source (faac-1.28.tar.gz) and unpack the package. Then, edit Makefile.am:

    SUBDIRS = include libfaac

    Also, edit the line beginning with AC_OUTPUT in the file configure.in:

    AC_OUTPUT(libfaac/Makefile include/Makefile Makefile)

    Then, compile FAAC like this

    sh bootstrap
    ./configure --prefix=/mingw --enable-static --disable-shared
    make
    make install


  10. x264


    x264 is yet another good video encoder. x264 requires YASM to build an optimized executable. So get yasm and save it as /mingw/bin/yasm.exe. Then, compile x264 like this:


    sh configure --prefix=/mingw --extra-cflags="-DX264_VERSION=20090608"

    make

    make install


  11. Compiling Mencoder


    Now you're ready to compile mencoder. Download the MPlayer source snapshot from mplayerhq.hu and unpack it. Then, type the following commands into the MSYS window to produce the executable mencoder.exe.


    CPPFLAGS='-DHAVE_INT32_T -DLIBTWOLAME_STATIC'./configure --prefix=/mingw --enable-runtime-cpudetection --enable-static --enable-theora --yasm=/mingw/bin/yasm

    make mencoder

    strip *.exe

    mv -iv mencoder.exe /c/Windows

    This produces a static executable mencoder.exe and copies it into the C:\WINDOWS folder.


If you'd like to try my mencoder build, download it from here. Its filename is MPlayer-svn-r30521-snapshot-3.4.5.zip.

Saturday, June 6, 2009

To Convert a FAT16 partition to FAT32 in Windows 98/ME

To convert a FAT16 partition to FAT32 in Windows 98/ME, you need to reboot with the emergency book floppy created by Windows. To create a boot floppy:


  1. Open the Start menu, open the Settings submenu and click the Control Panel.
  2. Click Add/Remove Programs.
  3. Select the Boot Disk tab in the pop-up window, and choose Create.
  4. Insert a blank floppy into your floppy drive and let Windows do the job.
  5. Then reboot your PC.


Once you're in DOS, change to C:\Windows\Command. Run CVT.EXE which will convert your FAT16 drive to FAT32.


C:

CD \WINDOWS\COMMAND

CVT C:

Thursday, April 23, 2009

Linux: Connecting to Wireless Networks with wpa_supplicant

Connecting to a wireless network in Linux is easy with wpa_supplicant. If you haven't, install the wpasupplicant package first. Also, install wireless-tools.


Of course, the driver for the wireless adapter has to be installed and loaded too. You can either use Linux native driver or Windows NDIS driver for your wireless device. The Linux kernel itself provides native driver modules for popular wireless chips. Alternatively, you can use a Windows driver in Linux with the help of ndiswrapper. I prefer using ndiswrapper to enable my wireless adapters. Once ndiswrapper is configured correctly, the following command will load the driver for the wireless network adapter.


modprobe ndiswrapper


In order to be able to control wpasupplicant with wpa_cli and wpagui, you should add useself to the netdev group.


adduser username netdev

To automatically have wpasupplicant take care of wireless connections, you should edit two files, /etc/network/interfaces and /etc/wpa_supplicant/wpa_supplicant.conf. The following is a sample /etc/network/interfaces file.


auto lo wlan1

iface lo inet loopback

iface default inet dhcp

iface WPA_hidden inet static
address 192.168.1.250
netmask 255.255.255.0
network 192.168.1.0
broadcast 192.168.1.255
gateway 192.168.1.1

iface wlan1 inet manual
wpa-driver wext
wpa-roam /etc/wpa_supplicant/wpa_supplicant.conf


Then, you need to create a configuration file /etc/wpa_supplicant/wpa_supplicant.conf. Its contents typically looks like this:


ap_scan=1
ctrl_interface=DIR=/var/run/wpa_supplicant GROUP=netdev

network={
ssid="MyWifiNet"
scan_ssid=1
key_mgmt=WPA-PSK
proto=WPA
pairwise=TKIP
group=TKIP
psk="WPA password"
id_str="WPA_hidden"
}

network={
ssid="linksys"
key_mgmt=NONE
wep_key0=e2c45314910abf72e871beda87
wep_tx_keyidx=0
}


In the example above, the ssid= and psk= lines should to be adjusted for each wireless network. The second nework linksys is an example of WEP networks. Next, run the following command to start a WPA connection to your wireless network.


wpa_supplicant -c /etc/wpa_supplicant.conf -i wlan1 -B


The steps below finalize wirless network setup.


ifconfig wlan0 192.168.1.201 up

route add default gw 192.168.1.1


Additionally, check the contents of /etc/resolv.conf which set up DNS servers.


To Kill WPA_supplicant


To terminate wpa_supplicant, execute wpa_cli and type the following commands:


terminate
quit

Sunday, April 5, 2009

Multiple Windows Installation

When the Vista Loader — also known as SoftMod or OEM BIOS emulation — is installed in a system with multiple Windows installations, Windows probably won't boot except the one in the first NTFS partition because the Grub4Dos code in the grldr file installed by the Vista Loader by default boots the first NTFS partition. In this case, you should uninstall Vista Loader from every Windows partition and then reinstall Vista Loader into a separate FAT logical partition. GRUB4DOS or pure GRUB will be used to load OEM BIOS emulation code into memory and then execute instructions in the menu.lst file to boot Windows in NTFS primary partitions.


To use multiple Windows installation, Grub4Dos and Vista Loader should be used together. This duo can be installed on a floppy or a bootable USB flash. The following is the contents of a menu.lst file used with Vista Loader.


timeout 0
default 0
fallback 1

title Vista Loader
map --mem (hd0,0)/vstaldr.img (fd0)
map --hook
chainloader (fd0)+1
rootverify (fd0)

title Windows Vista
find --set-root /bootmgr
chainloader /bootmgr


Related Posts


Saturday, March 28, 2009

Using GParted To Create Dual-Boot Vista Partitions

Have you ever wished to have multiple Windows installed on your computer? Having a multi-boot system has many applications, such as:


  • Set up one Windows system for your work or school, and set up another Windows system for your family and kids, all in one single computer
  • Use one Windows installation for your sensitive data, and use another installation for gaming and the Internet
  • Set up multiple Windows for different languages, for example one for English and another for Spanish
  • Try different Windows versions, one for Vista, one for XP and another for Windows ME.

In order to set up multiple installations of Windows in a single computer, you need to slice your hard drive into several partitions using a partitioning tool such as GParted. Get a GParted live CD and boot your computer with it.


Partitioning Advices


Here's what you need to know about multiple Windows installation:


  • One primary partition must be set up with Windows Vista or XP and set active. This partition will be used to boot itself and optionally other Windows partitions, primary or logical.
  • If multiple primary partitions have Windows installed, then only one of them should be active and the others should be hidden.


GParted in Action


Once you booted GParted live CD, launch GParted.


GParted first look

In most case, you'll see a Windows partion (type ntfs) as the first primary partition. If you need to resize it to make space available for the second Windows partition, you can use GParted, but I recommend you to use ntfsresize.


Now hide your existing Windows partition by right-clicking it and choosing Manage Flags.


GParted Manage Flags

Clear the boot flag and set the hidden flag. Then click Close.


GParted hide partition

Click the unallocated area and click New on the toolbar. Create new Partition dialog appears on screen. Set the size in the New Size box, create it as a Primary Partition and make it ntfs. Click Add.


GParted Create new Partition dialog

Look at the GParted window and make sure the new hard disk layout is okay. Click Apply on the toolbar.


GParted changed new layout

A confirmation dialog appears. Click Apply.
GParted Apply operations to device

If everything goes well, a dialog appears saying All operations successfully completed. Click Close.


GParted All operations successfully completed.

Right-click the newly created NTFS partition and select Manage Flags from the right-click menu. In the Manage flags window, only set the boot flag and click Close.


GParted Manage Flags

Quit GParted. Put your Windows installation DVD into your CD-ROM and reboot.

Tuesday, January 6, 2009

Disabling the Sleep Mode in Vista


With the default Vista power settings, pressing the Start menu power button will put the computer into a sleep mode. After newly installing Windows Vista, opening the Start menu will show the power button in amber yellow. This means clicking the power button will put the PC into the power-saving sleep mode instead of turning it off completely. The sleep mode saves the current state of the computer in memory, turns down the fans and keeps the PC quiet until you press a key or move a mouse.


But don't you find it annoying? I do. I want the PC turned off completely when I click the Power button. The following steps show you how to change Vista power settings so that clicking the Power button will turn off the PC:


  1. Click or press the Windows Logo button to open the Start menu.

  2. Click the Control Panel.

  3. Click System and Maintenance.

  4. Click Power Options.

  5. Click Change plan settings under the current preferred plan (by default, Balanced).

  6. Click Change advanced power settings.

  7. When the Power Options window appears, click the plus sign + next to Power buttons and lid to expand the section.

  8. Click the plus sign + next to Start menu power button.

  9. Change the Setting from Sleep to Shut down.

  10. Click OK to change the power options and close the window.

Monday, December 29, 2008

Backing up Hard Disk Partitions in Linux

To guard against disasterous hard disk failure or data loss, regular backup is very important. For Windows users, there's Norton Ghost which helps back up valuable data and settings in your hard disk. But for thrifty and savvy users, there's a nifty Linux tool called partimage. It's a simple console program but does its job great.

This tutorial guides you in backing up hard disk partitions in Linux. Let's assume you want to back up your Windows partition to a USB drive using partimage. If you are a Linux user, install partimage.

Otherwise, you can download and burn a System Rescue CD and boot with it. Connect your USB hard drive to your computer and mount it. If your USB drive has a FAT32 partition on /dev/sdb1, then the following command will mount it on /mnt:


mount -t vfat -o gid=100,dmask=2,fmask=113,shortname=winnt /dev/sdb1 /mnt

Make a folder called Backup and change to it:


cd /mnt

mkdir Backup

cd Backup

Save the partition table of your hard drive to a text file, assuming your hard drive is /dev/sda:


fdisk -l -u /dev/sda > hdptbl01.txt


Backing up with partclone


partclone is a new Linux tool for backing up and restoring hard disk partitions. The following command illustrates a situation where I back up the second partition, compress it on the fly and save the backup in 695M chunks.


partclone.ntfs -c -s /dev/sda2 | bzip2 -c | (cd /mnt/sdb1/Backup; split -d -b 695M - Backup-$(date +%F).partclone.bz2.)

Alternatively, you can use lzma to compress the backup.


partclone.ntfs -c -s /dev/sda2 | lzma -9c > Backup-$(date +%F).partclone.lzma

For quick backup, use lzop:


partclone.ntfs -c -s /dev/sda2 | lzop -c > backup-$(date +%F).partclone.lzo


Restoring Backups with Partclone


Here's a sample command:


cat Backup-2012-05-27.partclone.bz2.* | bzip2 -dc - | partclone.ntfs -r -o /dev/sda2


Backing up with Partimage


Assuming the partition to back up is /dev/sda1, the following command will back up /dev/sda1 in chunks of 695 MB so you can burn each piece on CD conveniently.


partimage -V 695 save /dev/sda1 backup01.pim

You'll be shown a number of options as seen below so you can tweak some settings. For example, if you want your computer to automatically power off after partimage finishes backup, check the Halt option. Press F5 to continue.


partimage save partition to image file options

Next, you will be given an option to enter description of the backup.


Partition Description

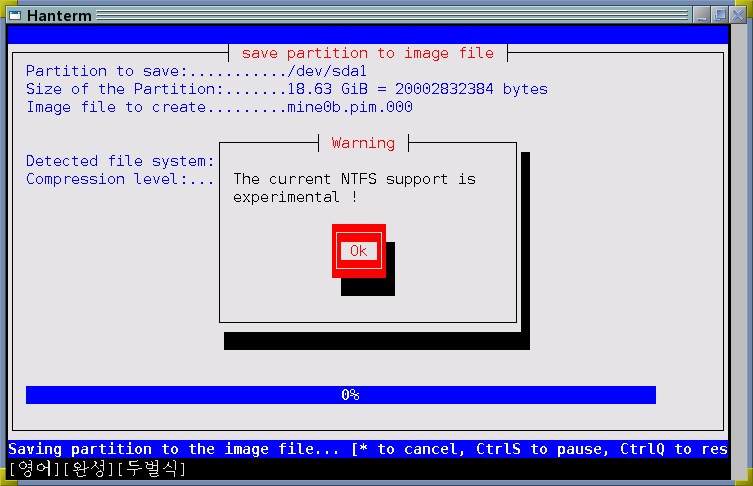
If the partition you're backing up is an NTFS partition (as most Windows partitions are), you'll be given the warning "The current NTFS support is experimental !". You can safely ignore it for now.


NTFS support is experimental

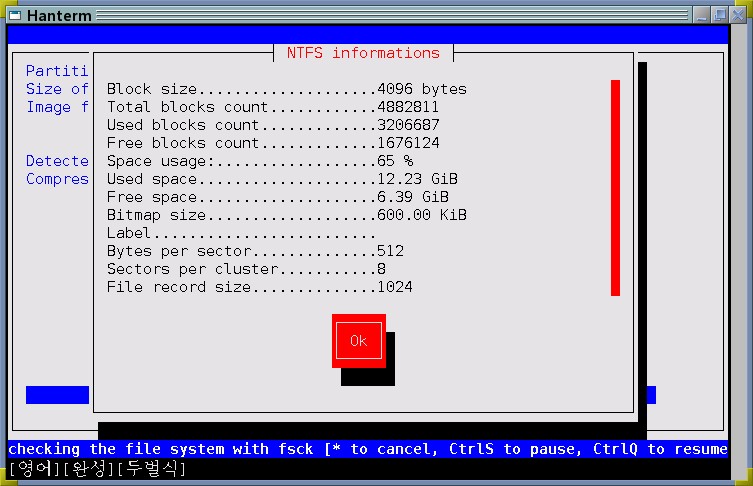
Next, you'll be shown NTFS information about the backup partition.


partimage NTFS information

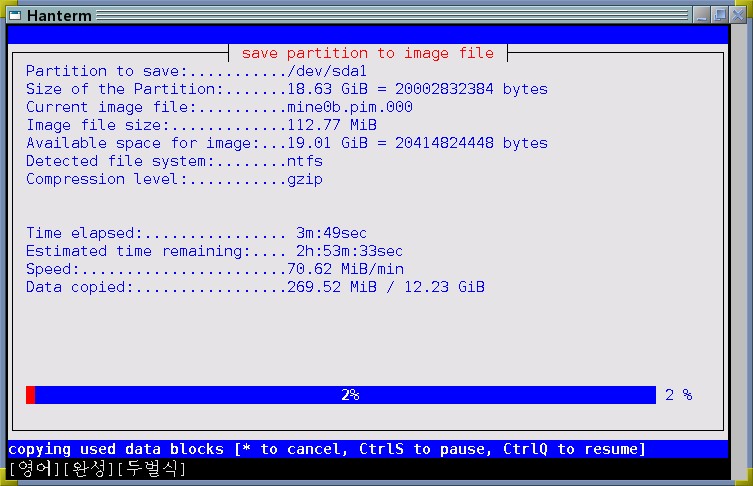
After that, partimage will start backing up as per instruction. A handful progress window will appear with the time remaining and progress in percentage.


partimage save partition to image file backup progress

Restoring Partitions with Partimage


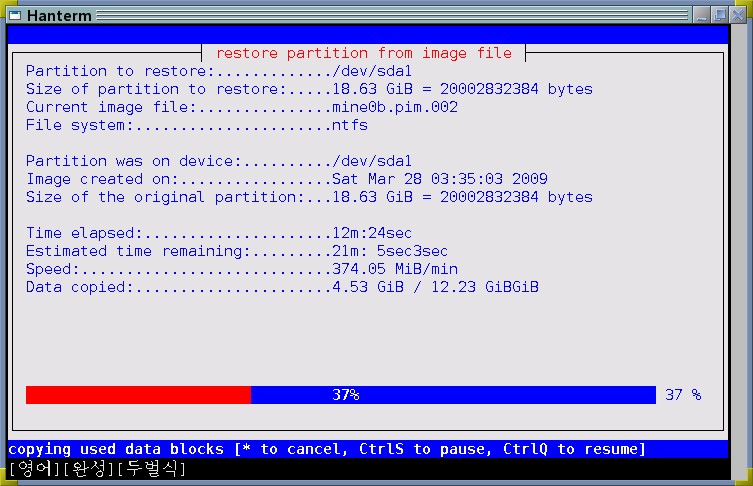
When something goes wrong with your computer, you can restore your hard disk partitions with the backup you've made with Partimage. First, make sure that you have a partition whose size is exactly the same as the partition the backup is made from. You can compare the current partition table with the contents of hdptbl01.txt file we've made earlier.

To restore the partition /dev/sda1 from a series of backup files starting with backup01.pim.000, open a console and type the following command:


partimage restore /dev/sda1 backup01.pim.000

Partimage restore partition from image file

Checking the Integrity of Partimage Backups


If you want to check partimage backups for integrity, specify the simulate option either on the command line or in the dialog, for example:


partimage --simulate restore /dev/sda1 backup01.pim.000


Related Posts


About This Blog

KBlog logo This blog seeks to share useful information on freely available fonts on the Internet. Thanks for visiting the blog and posting your comments.

© Contents by KBlog

© Blogger template by Emporium Digital 2008

Followers

Total Pageviews

CyberChimps Professional WordPress Themes
Powered By Blogger