Windows Vista service pack 2 provides many security fixes and brings performance improvements to the good, old Windows Vista operating system. Download the ISO file using the magnet links below:
Friday, June 28, 2013
Wednesday, April 10, 2013
Windows 7 Boot Floppy For OEM Activation
Although floppy diskettes are now obsolete and has become a thing of the past, they can be quite useful when Windows 7 or Windows Vista need to be activated. Floppy diskettes can only hold 1.44 MB of data, but that's enough for holding tools necessary for Windows activation. The floppy will contain MS-DOS system files, GRUB4DOS and tools to soft-mod the BIOS. Unfortunately, new and recent computers don't have floppy drives. Still, we can work around without a floppy if we use a USB flash drive or a bootloader, such as syslinux. Get the floppy image here.
The bootable floppy runs a small program that artificially inserts OEM SLIC signature into BIOS for the purpose of Windows activation before booting into Windows. There are 3 utilities included in the floppy.
- loadslic.exe
- softmod.exe
- grub.exe
Loadslic and softmod do the same job of loading SLIC into BIOS. Softmod loads a file named SLIC.BIN into BIOS, but loadslic contains a SLIC code in itself. If you want to change the OEM SLIC loaded by loadslic, you have to hack the loadslic binary with a hex editor. The AUTOEXEC.BAT file by default runs softmod, but you can edit AUTOEXEC.BAT to have it run loadslic. The following is AUTOEXEC.BAT contents:
@ECHO OFF
SOFTMOD
GRUB
Get the SLIC file for your computer and save it as SLIC.BIN. Then, create an empty file named WIN7 in C:\BOOT folder. This file is used to tell GRUB which partition you want to boot. The following is MENU.LST contents that Grub uses to find and boot Windows.
timeout 0
default 0
fallback 0
hiddenmenu

title Windows 7
find --set-root /boot/win7
chainloader /bootmgr
Finally, write the floppy image to a floppy with Winimage and restart the computer. If you don't have a floppy, use another bootloader, such as syslinux, to boot from the floppy image. Once you get into Windows, use slmgr to activate Windows.
slmgr -ilc oemcert.xrm-ms
slmgr -ipk XXXXX-XXXXX-XXXXX-XXXXX-XXXXX
Install GRUB4DOS and Use loadslic command to Activate Windows 7/Vista and Server 2008/2011
One of the activation methods available for activating Windows is by using the mechanism called “System Locked Pre-installation” (also known as SLP).
This method is widely used on computers and hardware sold by OEM manufacturers. Microsoft has come up with this scheme to allow hardware vendors to mass-produce and sell computers with Windows pre-installed. Computers that are activated using SLP method each have a vendor-specific signature embedded in the BIOS, called SLIC (software licensing description table).To use the SLP method, the computer must have a special BIOS that has OEM SLIC signature. The SLIC signature is unique for each OEM computer-manufacturer. You may be tempted to flash the BIOS with a SLP-enabled BIOS, but it is not safe and may break the computer system or make it unbootable. There are safer alternatives, and the most widely used artificial SLP activation method is by using a special version of GRUB4DOS patched with loadslic command. The patched GRUB4DOS is able to allow SLP activation for Windows 7, Windows Vista, Windows Server 2011 and Windows Server 2008 (available here).
First, use bootlace.com under DOS to install GRLDR bootstrap code to MBR. Alternatively, you can use install-mbr command under Linux to install generic MBR code to MBR. The reason for doing this is because the MBR code installed by Windows doesn't allow booting from non-Microsoft bootloader.
Then, with 7-zip (or WinRar or Winzip), copy the SCRIPTS folder from inside the OpenLoader.rar package to C:\Windows\Setup. Right-click on GRUB.CMD, and run it as Administrator. Upon reboot, a standard Grub4Dos menu is displayed with boot options. In the menu, you can choose one of several SLIC codes from major computer vendors. After choosing one and booting Windows with software-modified OEM SLIC BIOS, you should be able to activate Windows by using the slmgr commands like this.
slmgr -ilc oemcert.xrm-ms
slmgr -ipk XXXXX-XXXXX-XXXXX-XXXXX-XXXXX
Using the slmgr script requires the Administrator privilege. Open the Command Prompt (cmd.exe) as Administrator and type the above commands. Replace oemcert.xrm-ms with the actual digital certificate for the hardware vendor listed in your BIOS. And type the actual 25-digit OEM key in place of XXXXX-XXXXX-XXXXX-XXXXX-XXXXX.
Saturday, April 6, 2013
Activate Windows 7, Windows 8, Office 2010 and Office 2013 with KMS Nano
KMS Nano or KMSnano is a little KMS activation tool that works inside a Qemu virtual machine. It can be used to activate the following Microsoft products.
- Windows Vista Professional and Windows Vista Enterprise
- Windows 7 Professional and Windows 7 Enterprise
- Windows 8 Pro and Windows 8 Enterprise
- Microsoft Office 2010, Visio 2010 and Project 2010
- Microsoft Office 2013, Visio 2013 and Project 2013
KMS Nano can be found in a few places on the Internet. Try the following locations.
- heldigard latest KMS releases 17-12-2012
- LaDrunkv6.zip
This package also includes Qemu. - LaDrunkv6.zip
- LaSmartv5.2.zip
This package does not include Qemu, therefore it is very small in size.
Friday, April 5, 2013
윈도 7 서비스 팩 1 한국어 통합판
최근 업데이트된 윈도 7 서비스 팩 1 한국어 버전을 모두 모아 하나의 DVD 디스크로 만든 겁니다. 설치 디스크 하나로 모든 버전 설치가 가능한 윈도 7 서비스 팩 1 한국어 통합판 ISO 토렌트입니다. 많이 공유하시고 시드 유지 바랍니다.
torrent 받기: windows_7_sp1_11in1_korean.torrent
magnet 링크: magnet:?xt=urn:btih:540925E417DC52E9E3838BCD7B5AA7C3C4779AA9
포함된 버전:
torrent 받기: windows_7_sp1_11in1_korean.torrent
magnet 링크: magnet:?xt=urn:btih:540925E417DC52E9E3838BCD7B5AA7C3C4779AA9
포함된 버전:
- 윈도 7 STARTER K (32 비트)
- 윈도 7 HOME BASIC K (32 비트)
- 윈도 7 HOME PREMIUM K (32 비트)
- 윈도 7 PROFESSIONAL K (32 비트)
- 윈도 7 ULTIMATE K (32 비트)
- 윈도 7 ENTERPRISE K (32 비트)
- 윈도 7 HOME BASIC K (64 비트)
- 윈도 7 HOME PREMIUM K (64 비트)
- 윈도 7 PROFESSIONAL K (64 비트)
- 윈도 7 ULTIMATE K (64 비트)
- 윈도 7 ENTERPRISE K (64 비트)
Thursday, April 4, 2013
All Editions of Korean Windows 7 SP1 including Enterprise and Professional
Korean editions of Windows 7 are noted for having K attached to their names. For example, there are Windows 7 Professional K and Windows 7 Ultimate K for advanced Korean users. If you are a Korean speaker or do business in Korean, you may want to install and use Korean Windows. You can use aria2, transmission-cli and sancho to download Korean Windows 7. For example, the aria2 command to download Windows 7 K editions would be:
aria2c "magnet:?xt=urn:btih:H3K37RU7JM42WZZZBAPDMCPTQE3VHUXA"
The magnet link (inside the quote) will let you download both 32-bit and 64-bit editions of Windows 7 Korean editions, including Home Premium, Professional, Ultimate and Enterprise.
Sunday, March 31, 2013
March Sales going on at FocalPrice.com
The online global electronics retailer, FocalPrice is having March sales promotion with 5 new coupons! These coupons are valid from March 1 through March 31.

7% off Over $50 Site Wide coupon: AFF7OFF
Valid: Mar.01 to Mar.31, 2013, Free Shipping at Focalprice.com

Save $15 Over $120 Tablet PC coupon: AFFCE15
Valid: Mar.01 to Mar.31, 2013, Free Shipping at Focalprice.com

10% off Home Office coupon: AFFHO10
Valid: Mar.01 to Mar.31, 2013, Free Shipping at Focalprice.com

10% off Apple Accessoriess coupon: AFFA10
Valid: Mar.01 to Mar.31, 2013, Free Shipping at Focalprice.com

15% off Computers Networking coupon: AFFCN15
Valid: Mar.01 to Mar.31, 2013, Free Shipping at Focalprice.com

Up to 26% off Patricks Day
Ends on Mar.20, 2013, Free Shipping at Focalprice.com
There are lots of things on FocalPrice that you can buy with these coupons. Just take your time and browse the products there.
Labels:
advertising,
marketing,
promotion,
shopping


Friday, March 1, 2013
Download Microsoft Office 2013
Microsoft Office 2013 is out with new looks and features. This latest release of Microsoft Office features a flat and square design and integrates the free SkyDrive cloud storage service from Microsoft. Office 2013 is a trialware, meaning that you can try it for 30 days until you purchase a license key from Microsoft. Please be aware that Microsoft Office 2013 only supports Windows 7, Windows 8, Windows 2008 R2 and any later versions of Windows, so it won't run on Windows XP or Windows Vista.

If you want to download, install and try Microsoft Office 2013, there are downloadable ISO copies of Corporate Volume License editions of Microsoft Office 2013 available on bittorrent peer-to-peer file-sharing network. You can use any bittorrent application, but aria2 or transmission is recommended. In the following examples, transmission-cli can be used instead of aria2c.
- Microsoft Office Professional Plus 32bit 64bit 2013
- Microsoft Visio Professional 2013 RTM X86 Volume English DVD MSVLSC
- Microsoft Visio Professional 2013 RTM X64 Volume English DVD MSVLSC
- Microsoft Project Professional 2013 RTM X86 Volume English DVD MSVLSC
- Microsoft Project Professional 2013 RTM X64 Volume English DVD MSVLSC
To download English Volume License edition of Office Professional Plus 2013, type the following command on Command Prompt. This torrent contains both 32-bit and 64-bit editions of Microsoft Office 2013.
aria2c "magnet:?xt=urn:btih:N4CRYICBV3R2JO5CKFNWCVJ76FXKJLFB"
To download X86 Volume English edition of Microsoft Visio Professional 2013, type the following command on Command Prompt. A torrent is also available here.
aria2c "magnet:?xt=urn:btih:BVEARE7CO2PTBJXLBWVOHWAPVWQBENQ2"
To download X64 Volume English edition of Microsoft Visio Professional 2013, type the following command on Command Prompt. A torrent is also available here.
aria2c "magnet:?xt=urn:btih:Q37EIBGSJOBBNJG2E2AHOZQHWCC4D5IK"
To download X86 Volume English edition of Microsoft Project Professional 2013, type the following command on Command Prompt. A torrent is also available here.
aria2c "magnet:?xt=urn:btih:LKWVAEFXJNGNYA37ZV6YBAKC3AXNM45U"
To download X64 Volume English edition of Microsoft Project Professional 2013, type the following command on Command Prompt. A torrent is also available here.
aria2c "magnet:?xt=urn:btih:LRYKC5N22ILNC6Y6U7DTLECDGC3VOTMU"
When you use aria2 or transmission, please be patient with the program as it takes time to find the peers. Once you download the ISO, burn the ISO using a free ISO-burning tool, such as CDBurnerXP or ImgBurn. No product key or serial number is necessary when you install any of the above Volume License editions of Microsoft Office, Visio or Project Professional 2013. However, you may use the product for 30 days without restriction. After that, you need to activate the product to continue using it. Read this post to find out how to activate Microsoft Office 2013.
Also Read
Labels:
bittorrent,
download,
microsoft,
officesuite,
p2p,
software,
windows
To Activate Office 2013
Office 2013, also known as Office 15, is the latest release of the flagship office productivity suite from Microsoft. If you installed Office 2013 using a corporate volume license edition DVD and want to activate your copy of the product, you have to use an activation method that may include setting up a KMS server and connecting to the KMS server. However, if installing a KMS server on a separate Windows machine is not a feasible option, there are PC virtualization methods in which you run a KMS server inside a virtual machine (perhaps using QEMU.) There are many packages available on the Internet that help you automate this process.
One such package is KMS nano, and can be downloaded using a bittorrent application, such as aria2 or transmission-cli. The latest version of KMS nano comes in the .zip file called LaNano11.2.zip. Its torrent is available here.
Once you downloaded LaNano11.2.zip, extract and run KMSnano.exe. Remember to disable any antivirus program first. The program will silently start up a QEMU virtual machine with the IP address 127.0.0.3 and run a KMS server inside the virtual machine. It will also try to activate Windows 7, Windows 8, Office 2010 or Office 2012 if any of them is installed on the host computer. In most cases, the program will successfully activate your copy of Windows or Office and quit silently. If you want to monitor KMSnano or check whether it finished or not, press Ctl+Alt+Del at the same time and then open the Task Manager. You'll see a process called qemu-system-i386 running on a huge memory if KMSnano is still running. On a system with a limited amount of memory (less than 1.5 GB), KMSnano may take a long time or even fail.
If KMSnano fails for some reason, you need to take extra steps and do some manual hacking. Use 7-zip to extract the contents of KMSnano into an empty folder, for example, KMSNANO. Then, open a Command Prompt with the Administrator privilege, go to the KMSNANO folder, and type Manual.cmd. KMSELDI will pop up showing the IP address to use (127.0.0.3) and show you a black window in which you see Windows starting. While the virtual machine is running, open another Command Prompt with the administrator privilege. Type the following commands to activate your product.
cscript ospp.vbs /inpkey:xxxxx-xxxxx-xxxxx-xxxxx-xxxxx
cscript ospp.vbs /sethst:127.0.0.3
cscript ospp.vbs /act
The ospp.vbs script for Office 2013 can be typically located in C:\Program Files\Microsoft Office\Office15. The keys to type with the inpkey option can be found on this page. Once activation succeeds, the QEMU virtual machine will quit by itself. To check whether your copy of Windows or Office has been activated, you can run the Check_Activation.cmd script inside the KMSNANO folder.
Also Read
Labels:
hacking,
microsoft,
officesuite
Tuesday, February 12, 2013
Basala
Basala is a bold and square font designed by Hajime Kawakami, suitable for technology presentations. It's a well-made font.

- filename: basala.ttf
- file size: 44,191
- version: 03/03/2003
- glyph count: 184
- foundry: P22 / IHOF
It is included in P22 font pack and can be downloaded with aria2. Type the following command on the Command Prompt to download the Basala font.
aria2c "magnet:?xt=urn:btih:62f249af4e07f536a048870866c34b5b661ec2b1"
Friday, December 14, 2012
System Mechanic 11.5 Professional Video Reviews
System Mechanic 11.5 Professional has been released and now supports Windows 8. System Mechanic Pro is a total PC performance optimization package with patented technology for maximum speed, power and stability. It fixes frustrating errors, crashes and freezes and also provides triple-certified virus protection and data security. Even better, System Mechanic Pro comes with the Whole Home License that allows you to install on all your home PCs at no extra cost. Here's a nice video review of System Mechanic Pro.
Labels:
advertising,
antivirus,
computer,
deal,
discount,
marketing,
performance,
promotion,
sale,
software
Wednesday, December 12, 2012
Alternative to Times New Roman
 Times New Roman is the de-facto standard serif typeface for serious types of documents, including newspaper, business communication, reports and essays. Its popularity may be due to the fact that Times New Roman is included in every release of the Windows operating system, which is the dominant OS for PC's. Times New Roman is so widely used that it has become somewhat boring. So you may want to use a different typeface to give your document a refreshing look and feel. Below are some typefaces that you can try and use in your document instead of Times New Roman.
- Times LT
 Times LT is Linotype's version of Times family fonts. Personally, I believe that Linotype's Times Roman is aesthetically superior to Monotype's Times New Roman.
- Times LT Roman (lte51254.ttf)
- Times LT Italic (lte51255.ttf)
- Times LT Semibold (lte50867.ttf)
- Times LT Semibold Italic (lte50868.ttf)
- Times LT Bold (lte51256.ttf)
- Times LT Bold Italic (lte51257.ttf)
- Times LT Extra Bold
- Dutch 801 BT
Dutch 801 is a fine serif font family from Bitstream. Along with other Dutch releases, such as Dutch 766, Dutch 809, Dutch 811 and Dutch 823, it is a good substitute for Times New Roman.

It's easy to download Dutch 801 fonts if you know how to google using the font filenames (tt0011m_.ttf, tt0012m_.ttf, tt0013m_.ttf, tt0014m_.ttf, tt0549m_.ttf, tt0834m_.ttf, tt0835m_.ttf, tt0971m_.ttf, tt1035m_.ttf, tt1036m_.ttf).
 URW++ Nimbus Roman
Nimbus Roman No. 9L is a serif font released by URW++ for free personal and commercial use. It is metrically compatible with Times New Roman. The TrueType edition of Nimbus Roman is available in this package (urwfonts-1.41.tar.bz2).
- TeX Gyre Termes
Termes is based on URW++ Nimbus Roman No. 9L and contains international scripts. It is completely free and available here.
- Liberation Serif
Liberation fonts are metrically compatible with Monotype's Times New Roman, but have little similarity to Times New Roman. However, it's free.

Also Read
Wednesday, October 17, 2012
Installing Free Korean Fonts in Windows
Are you looking for free, good Korean fonts? You've come to the right place. Here I show you how to install Un fonts designed by a free Korean fonts project.
First, download the fonts from one of the links here. You may optionally choose to download additional fonts here.
Extract the fonts from the Debian package(s) with PeaZip or TugZip or any other tool.
Take the necessary steps to install the Un Korean truetype fonts in Windows.
Tuesday, October 16, 2012
Share your Linux desktop with x11vnc
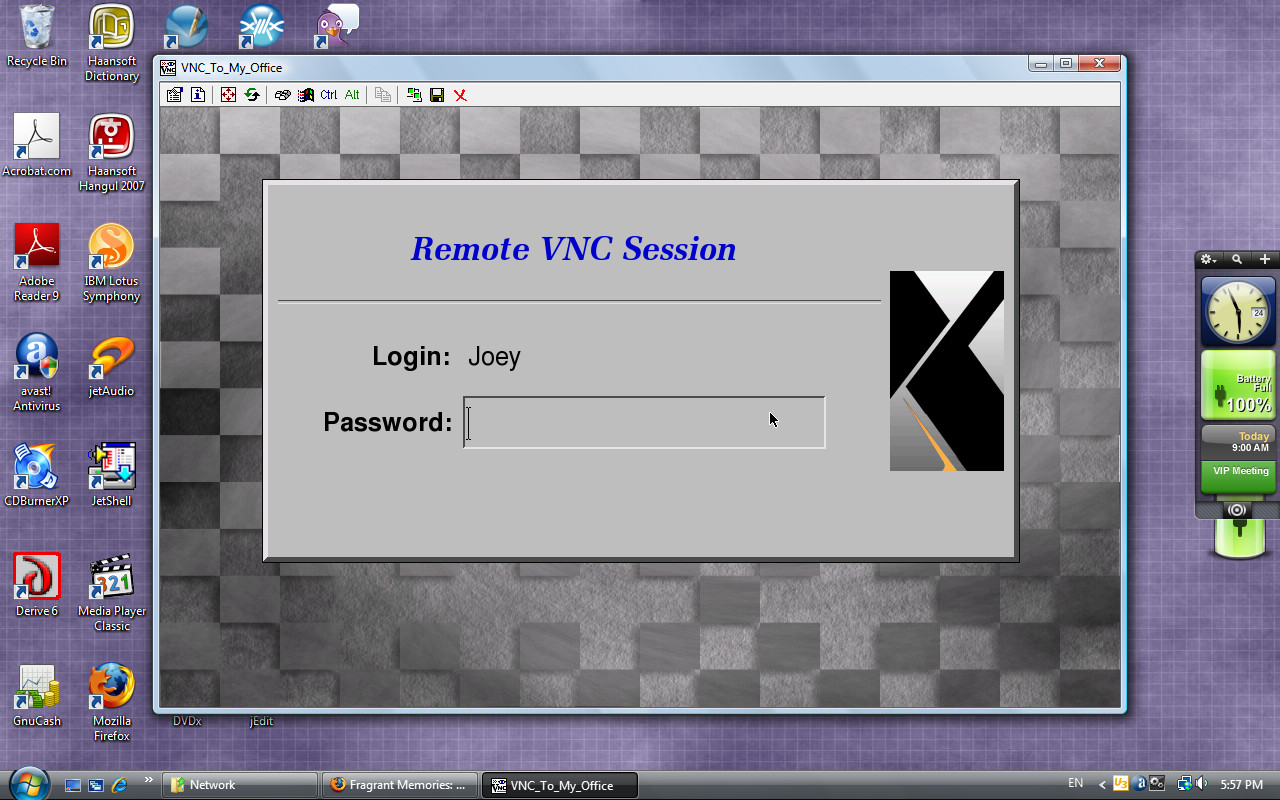
x11vnc is a pretty useful program that you can use to share your Linux desktop with someone far away. To start x11vnc while using X11 windows, issue the following command:
x11vnc -display :0
This command will work in most cases, assuming there is only one instance of X11 Windows server running. However, the display number could be different. To be sure, type the following command:
xdpyinfo | head
x11vnc will output a lot of information, including the port number it runs on:
The VNC desktop is:      bootcd:2
PORT=5902
Subtracting 5900 from the port number (5902), you'll get the display number (2). Use this number to connect to your desktop remotely. I use gvncviewer.
gvncviewer 192.168.200.83:2
Administrator To Monitor Someone's Desktop with X11VNC
Let's assume that you are a system administrator with root privilege and want to monitor a user's X11 Windows desktop. You can't just run “x11vnc -display :0” because you are not the user currently using display :0. In that case, you need access to the X11 Windows' xauth file which is located at one of the following locations:
- /var/lib/gdm
- /var/lib/kdm
- /var/lib/xdm/authdir/authfiles
- /home/USER/.Xauthority
Once you locate the xauth file associated with the user's X11 desktop, you can use x11vnc to monitor his desktop activity.
x11vnc -display :0 -auth /var/lib/gdm/\:0.Xauth
Then, on your desktop as administrator, connect to the user's desktop with a vnc client.
gvncviewer 192.168.200.83:2
x11vnc with SSL
x11vnc supports various connection schemes, including SSL. On Debian and Ubuntu, type the following command to create a SSL certificate for use with x11vnc.
cat /etc/ssl/private/ssl-cert-snakeoil.key /etc/ssl/certs/ssl-cert-snakeoil.pem > /tmp/x11vnc.pem
Then, start x11vnc with -ssl option to run x11vnc in secure mode.
x11vnc -display :0 -auth /var/lib/gdm/\:0.Xauth -ssl /tmp/x11vnc.pem
ssvnc and gvncviewer can be used to connect to x11vnc via SSL connection. The following example command starts x11vnc in anonymous SSL mode that doesn't require X509 exchange.
x11vnc -display :0 -xauth /var/lib/xdm/authdir/authfiles/A\:0-R2x5Db -xkb -nopw -nc_cr -ssl /tmp/x11vnc.pem -vencrypt newdh:nox509:support
Setting Up XDM on Debian/Ubuntu Linux
XDM, short for X Display Manager, is my favorite login manager for its simplicity. Sure, gdm and kdm are visually pleasant, but why do I have to install all the dependencies if xdm provides the same functionality as them? After all, xdm can launch GNOME and KDE for you — you just need to fix your ~/.xsession file. This post will serve as my notes on installation, configuration and customization of xdm.
All configuration of xdm, except for distribution-specific settings, is done by modifying the files in the /etc/X11/xdm directory. For now, I'll just go over what I have in my xdm files.
/etc/X11/xdm/Xaccess
This file is used to tell xdm who can use xdm. Therefore, if you are happy to let anyone access the X-Windows desktop locally or remotely, then you would just put an asterisk (*) in Xaccess as I did.
*
If you are very keen on security, you would put only the following in Xaccess. This only allows local users to have access to xdm.
localhost
127.0.0.1
However, even if Xaccess is set up as above, remote xdm login may still be possible with SSH X11 forwarding.
/etc/X11/xdm/Xresources
Xresources file is used to fine-tune the behavior and appearance of XDM. Here is what I put in my Xresources file:
Xcursor.theme: redglass
xlogin*login.translations: #override \
Ctrl<Key>R: abort-display()\n\
<Key>F1: set-session-argument(failsafe) finish-field()\n\
<Key>Delete: delete-character()\n\
<Key>Left: move-backward-character()\n\
<Key>Right: move-forward-character()\n\
<Key>Home: move-to-begining()\n\
<Key>End: move-to-end()\n\
Ctrl<Key>KP_Enter: set-session-argument(failsafe) finish-field()\n\
<Key>KP_Enter: set-session-argument() finish-field()\n\
Ctrl<Key>Return: set-session-argument(failsafe) finish-field()\n\
<Key>Return: set-session-argument() finish-field()
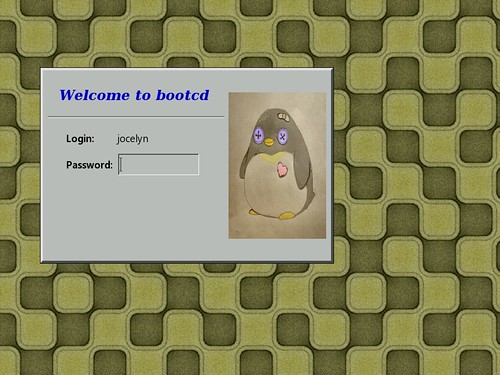
xlogin*greeting: Welcome to CLIENTHOST
xlogin*namePrompt: Login:\040
xlogin*passwdPrompt: Password:\040
xlogin*fail: Login incorrect
xlogin*greetFace: Serif-21:bold:italic
xlogin*face: Sans-15
xlogin*promptFace: Sans-15:bold
xlogin*failFace: Sans-16:bold
xlogin*geometry: 600x400
xlogin*borderWidth: 1
xlogin*frameWidth: 5
xlogin*innerFramesWidth: 2
xlogin*shdColor: grey30
xlogin*hiColor: grey90
xlogin*background: grey
xlogin*greetColor: Blue3
xlogin*failColor: red
*Foreground: black
*Background: #fffff0
xlogin*logoFileName: /usr/share/X11/xdm/pixmaps/penguin_doll_200x300.xpm
xlogin*useShape: true
xlogin*logoPadding: 10
I think the settings are self-explanatory. This is how xdm would look with the above settings. The penguin image was taken from here.
/etc/X11/xdm/Xresources
The Xresources file allows you to specify how many X servers to run and their command arguments. In my case, I run Xorg and Xvfb. Xorg is the standard X server, and Xvfb is a server that runs totally in memory without depending on the video hardware. To see what's going on with Xvfb, I use x11vnc and gvncviewer.
# Default X.org server
:0 local /usr/bin/Xorg :0 vt7 -br -dpi 96 -nolisten TCP

:1 local /usr/local/bin/Xvfb :1 -dpi 96 -screen 0 1024x768x16
/etc/X11/xdm/Xsetup
Xsetup allows you to write any command to run when xdm displays the login screen. In my case, I run gm to set up the background image and run x11vnc to remotely access Xvfb via VNC.
#!/bin/sh
#
# This script is run as root before showing login widget.

gm display -window root /usr/share/wallpapers/Board_Tile_Gray.jpg
xkbcomp -dflts -I/usr/share/X11/xkb /etc/X11/xkb/server-0.xkm $DISPLAY

PID_XVFB=$(pidof Xvfb)
PID_X11VNC=$(pidof x11vnc)
if [ -n "$PID_XVFB" -a -z "$PID_X11VNC" ]; then
  x11vnc -display :1 -bg -xkb -nopw -nc_cr -forever -listen localhost -auth $(find /var/lib/xdm/authdir/authfiles -name \*:1\*) > /var/log/x11vnc.log 2>&1
fi
/etc/X11/xdm/xdm-config
In xdm-config, there is only one line that I bother to change. This line enables remote xdm logins.
! SECURITY: do not listen for XDMCP or Chooser requests
! Comment out this line if you want to manage X terminals with xdm
DisplayManager.requestPort:     177
/etc/X11/xdm/xdm-options
I think xdm-options is Debian specific. I don't think I made any change in this file.
# configuration options for xdm
# See xdm.options(5) for an explanation of the available options.

no-ignore-nologin
no-restart-on-upgrade
no-start-on-install
use-sessreg
Resetting XDM
There are other files in /etc/X11/xdm directory that you can safely leave as is. After you make any change with the files, have xdm reread the config files.
kill -1 $(pidof xdm)
If you want to force xdm to kill all running sessions and restart, enter the following command.
/etc/init.d/xdm restart
That's all I have to write about xdm for now. In summary, xdm is a simple, yet functional login manager that is easy to set up.
Monday, October 15, 2012
Linux: Transmitting a Bunch of Files using socat

socat is a nifty, versatile tool for establishing a secure data channel between two computers. To install socat on Debian, use apt-get:
apt-get install socat
I was trying to use socat and tar to duplicate the contents of an entire filesystem securely between two computers. In this case, I copied all files in partition /dev/sda5 on box A to partition /dev/sdb6 on box B (IP 192.168.200.83).
Using the SCTP protocol
This method does not involve encryption, so it is relatively simple to follow.
First, I opened a terminal at box B (192.168.200.83) and changed the current directory to /mnt/sdb6 where I will unpack the incoming stream of files.
cd /mnt/sdb6
Then, I typed the following command to have socat establish a SCTP connection listening on port 7749. tar would be expecting to receive incoming files.
socat EXEC:"tar xzf -" SCTP4-LISTEN:7749
Then, I opened a terminal at box A. Here I would transmit a bunch of files to box B (192.168.200.83). I changed directory to /mnt/sda5 containing files to send.
cd /mnt/sda5
Then, I typed the following command to transmit all the files in the current directory.
socat EXEC:"tar czf - ." SCTP4-CONNECT:192.168.200.83:7749
Using the SSL connection
This method involves encrypted connection and requires SSL certicates on both sides of the link. Read this post to learn how to create self-signed SSL certificates if you don't already have one.
- Debian and Ubuntu automatically create a local SSL certificate at /etc/ssl/certs/ssl-cert-snakeoil.pem. Both parties of an SSL connection — box A and box B — should exchange each other's ssl-cert-snakeoil.pem in order to have SSL connections between them.
- On box B, I typed the following command to run socat in SSL listening mode at port 7749.
cd /mnt/sdb6
socat EXEC:"tar xzf -" OPENSSL-LISTEN:7749,reuseaddr,cert=/etc/ssl/certs/ssl-cert-snakeoil.pem,key=/etc/ssl/private/ssl-cert-snakeoil.key,cafile=box-A.pem - On box A, I typed the following command to run socat in SSL mode while running tar to pack all the files and send them through the pipeline.
cd /mnt/sda5
socat EXEC:"tar czf - ." OPENSSL:192.168.200.83:7749,cert=/etc/ssl/certs/ssl-cert-snakeoil.pem,key=/etc/ssl/private/ssl-cert-snakeoil.key,cafile=box-B.pem
Thus I have duplicated the whole directory tree from Box A to Box B. Using socat and tar, I was able to mirror a filesystem over the network. As shown above, socat alone can be a good substitute in situations where ssh, scp and/or netcat are needed. socat has many other features I have yet to explore.
Thursday, October 11, 2012
How to Extract Boot Images from Acronis Bootable CD
Acronis Backup and Restore is a great software to purchase for any business that wants to protect and preserve their digital assets from natural or accidental loss. After you purchase Acronis software and deploy it on your computers, you have a chance to create a bootable CD for emergency purpose. The Acronis boot CD will prove useful when you need to restore backups on a compromised or corrupted system.
However, you may want to incorporate Acronis software into your own custom boot CD. The custom CD can be a live Linux CD or live Windows CD. In that case, your ideal CD will have a menu of choices to run Acronis in addition to booting Linux or Windows. To create such a disc, you need to extract boot images from Acronis Boot CD. This post illustrates the steps needed to creat a custom CD containing Acronis software.
Bring your Acronis emergency CD and use the following command to create an ISO file. This assumes that you are using Linux. On Windows, you can use the readom program from my cdrkit build.
readom dev=/dev/sr0 f=ABR11.5AWUR_en-US.iso speed=8 retries=16 -nocorr -noerror
Acronis uses a special bootloader called BootWiz. To extract the boot image, you need to find the location of area that begins with BOOTWIZ0 string inside the ISO file. This is a hit-or-miss process. hexedit can be used here.
hexedit ABR11.5AWUR_en-US.iso
In hexedit, press Ctrl+S, then enter 424F4F5457495A30, which translates to BOOTWIZ0. Hit Enter.
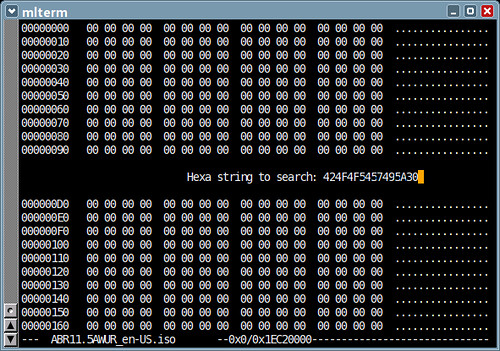
Hexedit will find the given string (BOOTWIZ0). Note the address of the line
(0x1A000). The address (0x1A000) is equivalent to 106496 in decimal, and 208 sectors. After you write down the address, quit Hexedit by pressing Ctrl+C.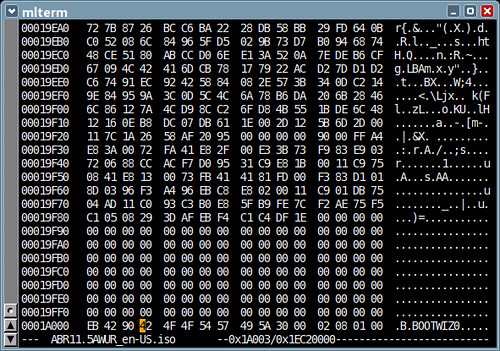
Use dd to extract the FAT filesystem image.
dd if=ABR11.5AWUR_en-US.iso of=abr11.bin skip=208
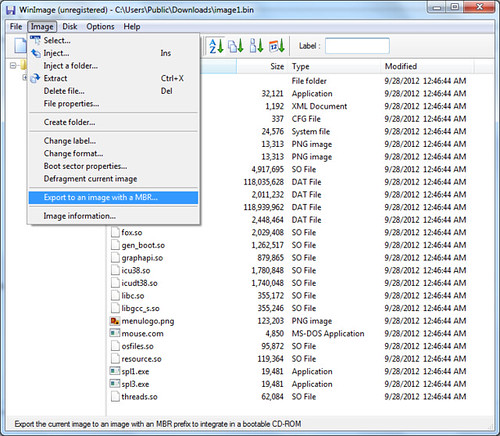
Use WinImage to convert the image file (abr11.bin) — actually a FAT filesystem image — to a hard disk image format with MBR.
Normally, you can just put the hard disk image on the CD and boot it using isolinux & memdisk.
LABEL abr11
MENU LABEL Acronis Backup & Restore 11
KERNEL memdisk
INITRD abr11.bin
Alternatively, you can mount the image file (abr11.bin) and extract only the kernel and initramfs.
mount -t msdos -o loop,ro abr11.bin /mnt
cd /mnt
cp dat*.dat /boot
The following is an example boot entry for isolinux that starts 64-bit Acronis Backup & Restore.
LABEL abr11x
MENU LABEL Acronis Backup & Restore 11 (64-bit)
KERNEL dat5.dat
INITRD dat4.dat
APPEND video=vesa:mtrr vga=0x317 product=bootagent media_for_windows quiet
The kernel parameters to put as APPEND string can be taken from the efi/boot/bootx64.xml.
Labels:
acronis,
administration,
backup,
computing,
technology
Aria2 shell script and batch file
I wrote a BASH shell script and a DOS batch file that can be used to download files using aria2 — Aria2 is a command-line tool for downloading files. The script and the batch file take 2 arguments; the first one is for the bittorrent hash in 40-digit hexadecimal number and the second one is for arbitrary one-word description.
aria2.bat can be used on Windows, and aria2.sh can be used on Linux and *BSD. Make sure that aria2c is in PATH. For example, if you want to download an ISO file for the OpenSUSE DVD, you would type something like:
aria2.bat 198472f5217d843cceb1a4c82233f009ed6608af opensuse-dvd-586
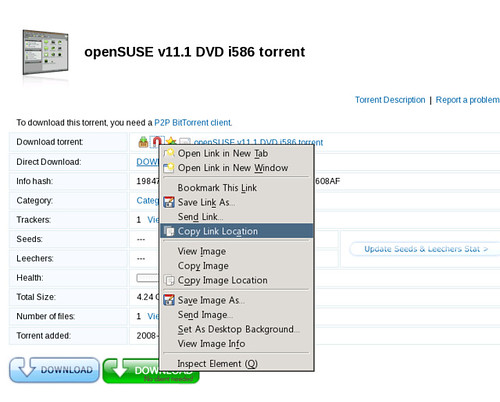
To find the value of a bittorrent hash (that long hex number), you can cut it from a magnet link you find on a Web site — Magnet links allow you to download actual files without first having to download bittorrent files (*.torrent). When you see a magnet sign, right-click on it to display the shortcut menu and select Copy Link Location.
Then, paste it somewhere, for example, inside the URL address bar. The hash value comes after the btih: string.
After you find the bittorrent hash, use it as the first argument to the script and make up anything for the second argument, as shown in the example above.
Tuesday, October 9, 2012
isolinux.cfg for a live CD
isolinux is a bootloader included in the syslinux package and is used to boot a CD or DVD. isolinux is one of several popular bootloaders used to create a bootable CD for open-source operating systems, including Linux and FreeDOS. Another bootloader is GRUB, which I rarely use except for booting Windows 7 with BIOS emulation.
To create a bootable CD with isolinux, just copy the file isolinux.bin to a folder that will hold CD contents for ISO mastering. On Debian or Ubuntu, the file is located at the /usr/lib/syslinux folder.
A file named isolinux.cfg needs to be created in order to provide a menu or boot entries. A sample isolinux.cfg is shown below. It makes use of vesamenu.c32 which helps display a nice graphical menu with a background picture. Vesamenu.c32 is also located in /usr/lib/syslinux and needs to be copied too.
# isolinux.cfg
# Configuration for ISOLINUX
# Wait for 60 seconds before booting up the default entry.
TIMEOUT 600
F1 help.txt #ff702640
UI vesamenu.c32
MENU RESOLUTION 640 480
MENU BACKGROUND back642.jpg
MENU COLOR border 30;44 #40dfdfdf #00000000 std
MENU COLOR title 1;36;43 #e0fdff49 #804206ef none
MENU COLOR sel 7;37;40 #e0000000 #40ffffff all
MENU COLOR hotsel 1;7;37;40 #e0af0000 #40ffffff all
MENU COLOR disabled 1;30;44 #ffe4de6f #00000000 std
MENU COLOR scrollbar 30;44 #40000000 #e0af0000 std
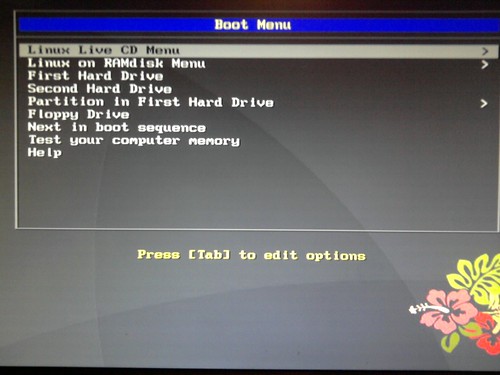
MENU TITLE Boot Menu
MENU CLEAR
MENU ROWS 14
MENU TABMSGROW 20
MENU CMDLINEROW 20
MENU TIMEOUTROW 22
MENU HELPMSGROW 24
MENU VSHIFT 1
# The default is to boot the first hard drive.
DEFAULT hd0
ONERROR hd1
MENU BEGIN livecd_menu
MENU TITLE Linux Live CD Menu
LABEL livecd_heading
MENU LABEL Boot Linux live CD
MENU DISABLE
LABEL livecd_640x480
MENU LABEL 640x480 screen
MENU INDENT 1
KERNEL 360.lnx
INITRD initram.lzm
APPEND root=/dev/sr0 edd=off vmode=640x480
LABEL livecd_800x600
MENU LABEL 800x600 screen
MENU INDENT 1
KERNEL 360.lnx
INITRD initram.lzm
APPEND root=/dev/sr0 edd=off vmode=800x600
LABEL livecd_1024x768
MENU LABEL 1024x768 screen
MENU INDENT 1
KERNEL 360.lnx
INITRD initram.lzm
APPEND root=/dev/sr0 edd=off vmode=1024x768
MENU SEPARATOR
LABEL livecd_console_heading
MENU LABEL Boot Linux live CD into text console
MENU DISABLE
LABEL livecd_console
MENU LABEL text-mode console
MENU INDENT 1
KERNEL 360.lnx
INITRD initram.lzm
APPEND root=/dev/sr0 nox
LABEL livecd_console_old
MENU LABEL text-mode console for an old computer
MENU INDENT 1
KERNEL 360.lnx
INITRD initram.lzm
APPEND root=/dev/sr0 acpi=off irqpoll nox
MENU SEPARATOR
LABEL exit0
MENU LABEL Return to the main menu.
MENU EXIT
MENU END
MENU BEGIN cdram_menu
MENU TITLE Linux on RAMdisk Menu
LABEL cdram_heading
MENU LABEL Boot Linux on RAMdisk
MENU DISABLE
LABEL cdram_640x480
MENU LABEL 640x480 screen
MENU INDENT 1
KERNEL 360.lnx
INITRD initram.lzm
APPEND boot=cdrom root=/dev/ram ramdisk_size=573440 edd=off vmode=640x480
LABEL cdram_800x600
MENU LABEL 800x600 screen
MENU INDENT 1
KERNEL 360.lnx
INITRD initram.lzm
APPEND boot=cdrom root=/dev/ram ramdisk_size=573440 edd=off vmode=800x600
LABEL cdram_1024x768
MENU LABEL 1024x768 screen
MENU INDENT 1
KERNEL 360.lnx
INITRD initram.lzm
APPEND boot=cdrom root=/dev/ram ramdisk_size=573440 edd=off vmode=1024x768
MENU SEPARATOR
LABEL cdram_console_heading
MENU LABEL Boot Linux RAMdisk into text console
MENU DISABLE
LABEL cdram_console
MENU LABEL text-mode console
MENU INDENT 1
KERNEL 360.lnx
INITRD initram.lzm
APPEND boot=cdrom root=/dev/ram ramdisk_size=573440 nox
LABEL cdram_console_old
MENU LABEL text-mode console for an old computer
MENU INDENT 1
KERNEL 360.lnx
INITRD initram.lzm
APPEND boot=cdrom root=/dev/ram ramdisk_size=573440 acpi=off irqpoll nox
MENU SEPARATOR
LABEL exit1
MENU LABEL Return to the main menu.
MENU EXIT
MENU END
LABEL hd0
MENU LABEL First Hard Drive
LOCALBOOT 0x80
LABEL hd1
MENU LABEL Second Hard Drive
KERNEL chain.c32
APPEND hd1 swap
MENU BEGIN hd0_menu
MENU TITLE Partition in First Hard Drive
LABEL hd0_part1
MENU LABEL 1st partition
KERNEL chain.c32
APPEND hd0 1
LABEL hd0_part2
MENU LABEL 2nd partition
KERNEL chain.c32
APPEND hd0 2
LABEL hd0_part3
MENU LABEL 3rd partition
KERNEL chain.c32
APPEND hd0 3
LABEL hd0_part4
MENU LABEL 4th partition
KERNEL chain.c32
APPEND hd0 4
LABEL hd0_part5
MENU LABEL 5th partition
KERNEL chain.c32
APPEND hd0 5
LABEL hd0_part6
MENU LABEL 6th partition
KERNEL chain.c32
APPEND hd0 6
LABEL hd0_part7
MENU LABEL 7th partition
KERNEL chain.c32
APPEND hd0 7
LABEL hd0_part8
MENU LABEL 8th partition
KERNEL chain.c32
APPEND hd0 8
LABEL hd0_part9
MENU LABEL 9th partition
KERNEL chain.c32
APPEND hd0 9
LABEL hd0_part10
MENU LABEL 10th partition
KERNEL chain.c32
APPEND hd0 10
MENU SEPARATOR
LABEL exit3
MENU LABEL Return to the main menu
MENU EXIT
MENU END
LABEL fd0
MENU LABEL Floppy Drive
LOCALBOOT 0x00
LABEL next
MENU LABEL Next in boot sequence
LOCALBOOT -1
LABEL memtest
MENU LABEL Test your computer memory
LINUX memtest.bin
TEXT HELP
Run Memtest86 to test your computer memory
ENDTEXT
LABEL help
MENU LABEL Help
MENU HELP help.txt #ff702640
The example above is one that I use for my live CD, so some settings are specific to my situation. Thus, KERNEL and APPEND settings may have to be adapted for other users. However, all the keywords shown above is standard and acceptable.
Labels:
bootcd,
bootloader,
bootstrap,
linux,
syslinux
Monday, October 8, 2012
Linux: Building X.org Kdrive Server Xfbdev on Debian Wheezy
Kdrive is a minimal X11 server that runs as a single executable with little dependencies. I use Kdrive for my Web-only/Rescue Linux systems. Before compiling Kdrive, I installed the following packages on my box running Debian Sid — which will be eventually rolled into Wheezy release:
- bison
- g++-4.7
- libexpat1-dev
- libpciaccess-dev
- libpixman-1-dev
- libssl-dev
- libudev-dev
- libxdamage-dev
- libxfont-dev
- libxi-dev
- libxkbfile-dev
- libxmu-dev
- libxxf86vm-dev
- make
- pkg-config
- x11proto-bigreqs-dev
- x11proto-composite-dev
- x11proto-randr-dev
- x11proto-render-dev
- x11proto-resource-dev
- x11proto-scrnsaver-dev
- x11proto-video-dev
- x11proto-xcmisc-dev
- x11proto-xf86dga-dev
- x11proto-xinerama-dev
- xkb-data
Installing X Protocol Headers
The current RandR protocol headers from Debian didn't meet the required version, so I had to download the latest one from freedesktop.org. I installed randrproto like this.
tar xjvf randrproto-1.4.0.tar.bz2
cd randrproto-1.4.0
./configure --prefix=/usr
make install
Compiling Xfbdev
I got the latest X.org release from freedesktop.org. The following commands will build Xfbdev:
tar xjf xorg-server_1.13.0.tar.bz2
cd xorg-server-1.13.0/
./configure --prefix=/usr --disable-xorg --enable-kdrive --enable-kdrive-evdev --enable-config-udev --disable-aiglx --disable-glx --disable-dri --disable-dri2 --disable-drm --disable-record --with-xkb-path=/usr/share/X11/xkb --with-xkb-output=/var/lib/xkb --with-xkb-bin-directory=/usr/bin --with-default-xkb-rules=xorg --with-default-xkb-model=pc105 --with-default-xkb-layout=us
make
make install
Installed Files
The following files are installed after successfully building a Kdrive server.
/usr/bin/Xfbdev
/usr/bin/Xnest
/usr/bin/Xvfb
/usr/lib/xorg/protocol.txt
/usr/share/man/man1/Xnest.1
/usr/share/man/man1/Xserver.1
/usr/share/man/man1/Xvfb.1
/var/lib/xkb/README.compiled
To Use Xfbdev
An executable file Xfbdev will be created in /usr/bin. To be able to use the Xfbdev server, framebuffer video must be enabled either in the kernel or as a module. If CONFIG_FB_VESA option was enabled in the kernel, you can use the syslinux bootloader in the following way to boot Linux into a framebuffer video mode:
LABEL minimal
KERNEL vmlinuz-2.6.31.5
INITRD initramfs.lzma
APPEND vga=0x314 video=vesafb:mtrr
Once the framebuffer video has been activated, Xfbdev can be started in the following way:
Xfbdev :0 vt7 dpms -ac -br +bs -dpi 96 -mouse evdev,5,device=/dev/input/event2 -2button -keybd evdev,,device=/dev/input/event3 -fp /usr/local/share/fonts,/usr/share/fonts/X11/Type1,/usr/share/fonts/truetype/ttf-dejavu -nolisten TCP
Download my X.org build 1.13.0

Here you can obtain my compiled binaries Xfbdev, Xnest and Xvfb:
Also Read:
Saturday, October 6, 2012
My Live CD based on Debian Linux Sid
I created a Live CD from my Debian Linux installation. It is based on the unstable version (Sid). However, the live CD still lacks the capability to automatically configure X-Windows and the network, and uses IceWM for minimalist desktop. It can be downloaded from Google Drive. This Live CD has many uses, such as:
- To troubleshoot and fix computer problems
- To create backups and restore them
- To partition a hard drive before installing Windows or Linux
- To set up GRUB bootloader or enter boot commands
- To install Debian, Ubuntu or Fedora
- To access a Windows partition when it is unbootable
- To survey and diagnose wireless and wired networks
- To enjoy the Internet with the Web, IM, IRC and VoIP
- To run a simple FTP or HTTP server
- To participate in peer-to-peer networks
- To do basic word processing and spreadsheet
- To listen to music or watch movies
- To rip CD's and DVD's
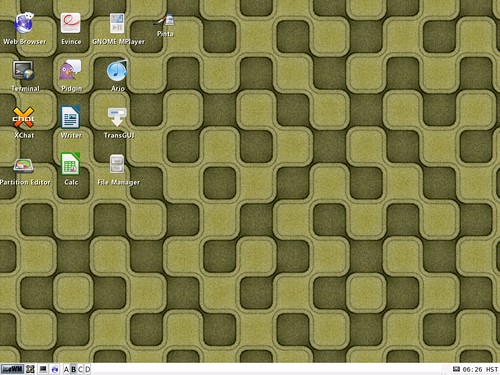
The snapshot above shows idesk icons on the desktop. Idesk is a neat application that displays icons on the desktop for you to quickly launch. Currently, I use IceWM instead of GNOME or KDE desktop to save space on the CD. So idesk is used to provide desktop icons for IceWM.
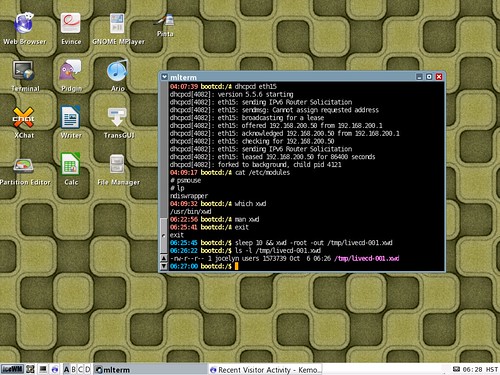
The snapshot above shows mlterm running. mlterm is my favorite terminal application. It allows me to use many languages.
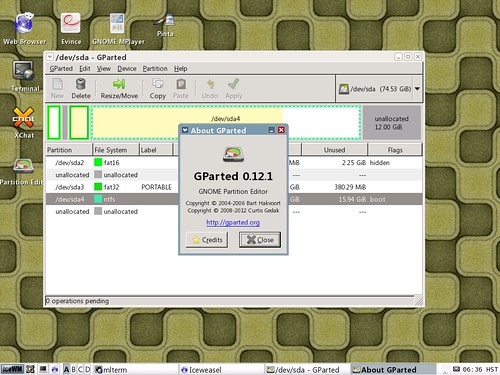
Gparted is a cool application to have on a live CD. It lets you divide the hard drive into many partitions so you can run multiple operating systems.
IceWeasel is rebranded Firefox from Debian. Sorry, Chrome is not included.
LibreOffice is a fork of OpenOffice.org suite. I use it to create documents or read Microsoft Office documents.
Specifying the locale at boot time
To see your own language with the live CD, select an entry from the menu, click Tab and append LANG= option to the command line. For example, if you speak French, append LANG=fr_FR.UTF-8.
Friday, October 5, 2012
Using GraphicsMagick to Set the Background
GraphicsMagick is a powerful graphics tool that can be used to set the background on Linux. I've been using xsetbg from the xloadimage package to set X-Windows background. However, I realized that GraphicsMagick can replace xloadimage and netpbm that I've used for setting background and converting images.
So far I just learned a few tricks for setting background with GraphicsMagick. To tile an image on the background, type a command like this:
gm display -window root background.jpg
To fill the background with an image smaller than the screen size, use the -geometry option:
gm display -window root -geometry 1440x960 Background.jpg
You can also use the percentage (%) sign to zoom in or out the image and place it on the background.
gm display -window root -geometry 300x200% background.jpg
You can add the -gamma option to darken or brighten the image. If gamma is less than 1, the output image will be darker. If gamma is greater than 1, the image will be brighter.
gm display -window root -gamma 0.5 BG_pix.jpg
There are many more options that you can use with GraphicsMagick, for example, -crop, -dither, -trim etc. Read the manual page of GraphicsMagick and documentation for further information.
Thursday, October 4, 2012
Disk Cloning / Imaging over Network with SSH, Netcat, DD and XZ
Today we have affordable, ample storage and faster bandwidth to facilitate partition imaging and disk cloning over network. Nowadays, it's common and feasible to take the image of a whole partition for various reasons. Compared to file-based backups using tar, disk imaging provides the following advantages.
- The boot sector is preserved so that it's easy to make it bootable after the restore.
- Information such as UUID and LABEL is presered, which helps identify the partition in booting and mounting.
- Information such as ACL and XATTR is preserved, which helps restrict file access and secure the system.
- Every bit in the unused sectors is preserved, which may assist in digital forensics to uncover deleted or hidden information.
There are commercial programs for disk imaging and backup (Norton Ghost, Acronis True Image). However, Linux users can use readily available tools to get things done. For disk cloning/imaging, we can use ssh, netcat, dd and xz. Note that dd will fail on physically damaged disks. For such disks, use ddrescue instead.
For security and compression, we are going to use ssh and xz in this tutorial. If you don't like xz, feel free to substitute xz with gzip, bzip2 or lzop. Also, netcat is used to stream the dd output over the network. On Debian and Ubuntu derivatives, you need the following packages.
- bzip2, gzip, lzop, lzma OR xz-utils
- dd
- netcat
- ssh
We are making these assumptions in the following scenarios.
- Sending computer S
This computer has IP address 192.168.1.1 and needs to back up partition /dev/sda1. - Sending Port
We'll send using port 5525. - Receiving computer T
This computer has IP address 192.168.1.2 and needs to restore partition /dev/sda2. - Receiving Port
We'll receive at port 7749.
Disk Cloning using dd, xz, netcat and ssh
In this scenario, we will clone a disk partition, simultaneously sending an image of the source partition /dev/sda1 from computer S (192.168.1.1) and restoring it at /dev/sda2 on computer T (192.168.1.2). Make sure that the source partition is not mounted or is mounted read-only. Also, make sure that the target partition size is greater than or equal to the source partition size.
- At the sending computer, compress the source partition /dev/sda1 with xz and set up netcat to send it at port 5525:
dd if=/dev/sda1 bs=16M | xz | nc -l 5525
- At the receiving computer, set up a SSH tunnel to the sending computer (192.168.1.1):
ssh -f -N -L 7749:127.0.0.1:5525 username@192.168.1.1
- At the receiving computer, type the following command to receive the partition image and restore it at /dev/sda2:
nc 127.0.0.1 7749 | xz -d | dd of=/dev/sda2 bs=16M
Alternatively, we could take the following steps to achieve the same thing. However, we start at the receiving computer.
- At the receiving computer with the target partition /dev/sda2, type the following command to receive the partition image:
nc -l 7749 | xz -d | dd of=/dev/sda2 bs=16M
- At the sending computer with the source partition /dev/sda1, set up a SSH tunnel to the receiving computer (192.168.1.2):
ssh -f -N -L 5525:127.0.0.1:7749 username@192.168.1.2
- At the sending computer, type the following command to compress the source partition /dev/sda1 and transmit it over the SSH tunnel:
dd if=/dev/sda1 bs=16M | xz | nc 127.0.0.1 5525
Note that the transfer may take many hours for a large partition.
Disk Imaging using dd, xz, netcat and ssh
In this scenario, we will just send an image of the source partition /dev/sda1 to the receiving computer T (192.168.1.2) without restoring it. Make sure that the source partition is not mounted or is mounted read-only. A question remains whether to compress the image at the sending or receiving computer. The answer depends on which computer is more powerful. For this example, we'll compress at the sending computer (for network bandwidth reason).
- At the sending computer, compress the source partition /dev/sda1 with xz and stream it using netcat:
dd if=/dev/sda1 bs=16M | xz | nc -l 5525
- At the receiving computer, set up a SSH tunnel to the sending computer (192.168.1.1):
ssh -f -N -L 7749:127.0.0.1:5525 username@192.168.1.1
- At the receiving computer, type the following command to receive the file:
nc 127.0.0.1 7749 > partimg.xz
Alternatively, we could take the following steps to achieve the same thing.
- At the receiving computer, set up netcat to listen at port 7749 and save the incoming data to a file partimg.xz.
nc -l 7749 | dd of=partimg.xz bs=16M
- At the sending computer, establish a SSH tunnel to the receiving computer (192.168.1.2) first:
ssh -f -N -L 5525:192.168.1.2:7749 username@192.168.1.2
- At the sending computer, type the following command to compress the source partition /dev/sda1 and transmit it over the SSH tunnel:
dd if=/dev/sda1 bs=16M | xz | nc 127.0.0.1 5525
Note that the transfer may take many hours for a large partiiton.
Alternative Simple Commands for Disk Cloning / Imaging
I don't like these methods for some reason, but here I show the simpler methods where netcat is not needed. For disk cloning, type something like this:
dd if=/dev/sda1 bs=16M | xz | ssh username@192.168.1.2 "xz -d | dd of=/dev/sda2 bs=16M"
Just to send an image file, run a command as follows:
dd if=/dev/sda1 bs=16M | xz | ssh username@192.168.1.2 "dd of=partimg.xz bs=16M"
Also Read:
Labels:
administration,
backup,
computer,
linux,
technology,
unix
Monday, October 1, 2012
Bittorrent Info Hash Values for Windows 8 ISO
Windows 8 ISO files have the following BTIH hash values. Use them with my aria2 script to download Windows 8.
- en_windows_8_x86_dvd_915417.iso
C5D92B32277685436DEDE9957B80083D26062C03 - en_windows_8_x64_dvd_915440.iso
144C7E2B46103FF84F83A1E6A12D66B740F00CF6
Labels:
bittorrent,
checksum,
download,
hash,
magnet,
p2p,
software,
technology,
windows,
windows 8
Sunday, September 30, 2012
Download Linux Kernel 3.5.4 / 3.6.0
I am sharing my kernel builds for Linux 3.5.4 and 3.6.0. Hope it works for everyone.
To Compile ndiswrapper 1.58rc1 for Linux 3.5.4
ndiswrapper allows Linux users to use Windows drivers for PCI/USB network adapters on Linux. If you own a network device for which Linux support is still absent or premature, then you need to compile ndiswrapper yourself and install Windows driver for your network device. Fortunately, today's Linux supports most network devices out-of-box, so most distributions don't bother to include ndiswrapper. However, I am compiling ndiswrapper believing that Windows NDIS drivers would outperform native Linux drivers.
To my surprise, building the latest version of ndiswrapper (1.58rc1) did not require any patch. After compiling Linux 3.5.4, I downloaded the ndiswrapper source from the sourceforge site. I chose the testing version because I thought it would work better with Linux 3.5.x. I unpacked the source.
tar xzvf ndiswrapper-1.58rc1.tar.gz
cd ndiswrapper-1.58rc1
I typed the following commands to compile and install ndiswrapper.
KVERS=3.5.4 make uninstall
KVERS=3.5.4 make
KVERS=3.5.4 make install
Then, I generated modules.* files again.
depmod -e -m -F /boot/System.map-3.5.4 3.5.4
The following files were installed by ndiswrapper.
/lib/modules/3.5.4/misc/ndiswrapper.ko
/sbin/loadndisdriver
/usr/sbin/ndiswrapper
/usr/sbin/ndiswrapper-buginfo
/usr/share/man/man8/loadndisdriver.8
/usr/share/man/man8/ndiswrapper.8
Also read:
Happiness the Movie 2007
Happiness is a Korean movie that makes you think seriously about the true meaning of happiness in life. It tells a story of two terminal patients who met at a remote nursing home and fell in love with each other. However, the guy leaves the girl for a careless, material life in the city. In the end, he comes back to the girl only to find her dying and regrets having left her. The movie tries to teach us that true happiness is about being close to someone you care about no matter how sick or poor he/she is.
Saturday, September 29, 2012
My All-Purpose Init Script for initrd / initramfs Boot Images
Here I post my init script. It is used in my initrd/initramfs boot images for the following purposes.
- Boot from a live CD / DVD
- Boot from a read-only filesystem image, compressed in SquashFS
- Copy the filesystem image to a RAM disk and run Linux entirely on memory
- Boot Linux from a USB flash drive
- Boot Linux from a local disk partition
- Run a rescue shell without booting Linux
I have yet to implement network booting. Right now it is good enough for my current needs. It takes the following boot parameters.
- root=
Specifies the root partition to boot Linux from. For example, /dev/sda2. - label=
Specifies the label of the device to boot from. For example, label=DEBIAN. - uuid=
Specifies the UUID of the device to boot from. For example, uuid=dcfd6a0a-2a0f-4b3d-8a1a-5e7d642ebfbd - boot=
Can be cdrom, loop, ram, usb or ata. - vmode=
Specifies the screen resolution of the framebuffer video. For example, vmode=640x480 - single
Boot into the single-user mode. - nox
Boot into the console mode in runlevel 2
#!/bin/dash

# Define a function to parse kernel command line options.
get_opt() {
  echo $@ | cut -d "=" -f 2
}

# Define a function to load drivers.
loadmod() {
  for i in $@ ; do
    for j in $(grep $i /tmp/pcimodules.txt); do
      modprobe $j
    done
  done
}

# Define a function to guess the partition type.
gpart() {
  for i in $(blkid | grep $1); do
    case $i in
      *\=*)
        eval $i
        ;;
      *)
        true
        ;;
    esac
  done
}

# Define a function for mounting the root partition.
mountr() {
  if [ $uuid ]; then
    if [ $# = 2 ]; then
      mount -r -U $uuid $2
    elif [ $# = 1 ]; then
      mount -r -U $uuid $1
    else mount -r -U $uuid /mnt
    fi
  elif [ $label ]; then
    if [ $# = 2 ]; then
      mount -r -L $label $2
    elif [ $# = 1 ]; then
      mount -r -L $label $1
    else mount -r -L $label /mnt
    fi
  else
    gpart $1
    case $TYPE in
      ext*)
        e2fsck -p $1
        [ $# = 2 ] && mount $1 $2 || mount $1 /mnt
        ;;
      jfs)
        jfs_fsck $1
        if [ $# = 2 ]; then
          mount -t jfs -o ro,iocharset=utf8 $1 $2
        else mount -t jfs -o ro,iocharset=utf8 $1 /mnt
        fi
        ;;
      vfat)
        if [ $# = 2 ]; then
          mount -t vfat -o ro,gid=100,dmask=2,fmask=113 $1 $2
        else mount -t vfat -o ro,gid=100,dmask=2,fmask=113 $1 /mnt
        fi
        ;;
      *)
        [ $# = 2 ] && mount -r $1 $2 || mount -r $1 /mnt
        ;;
    esac
  fi
}

# Create a union filesystem
union() {
  mount -t tmpfs none /opt/tmp
  modinfo unionfs > /dev/null 2>&1 &&
  mount -t unionfs -o dirs=/opt/tmp=rw:/opt=ro none /mnt ||
  ( mkdir /opt/tmp/.change
    modprobe fuse
    unionfs-fuse -o allow_other,use_ino,suid,dev,nonempty,kernel_cache \
     -o cow,chroot=/opt,max_files=32768 /tmp/.change=RW:/=RO /mnt )
}

# Mount proc and sysfs.
mount -t proc none /proc
mount -t sysfs none /sys

# Find the available PCI hardware
mount -t tmpfs none /tmp
pcimodules > /tmp/pcimodules.txt

# Populate /dev (Needs kernel >= 2.6.32)
mount -t devtmpfs none /dev
mkdir -m 755 /dev/pts
mount -t devpts -o gid=5,mode=620 none /dev/pts

# Set default values
boot=ata
root=/dev/sda6

# Find the root=, label=, uuid= and boot= values on kernel command line.
for i in $(cat /proc/cmdline); do
  case $i in
    root\=*)
        root=$(get_opt $i)
        case $root in
          /dev/cdr* | /dev/dvd* | /dev/sr* | /dev/scd*)
            boot=cdrom
            ;;
          0x200)
            root=/dev/fd0
            ;;
        esac
        ;;
    label\=* | uuid\=* | boot\=* | vmode\=* )
        eval $i
        ;;
    single)
        RUNLEVEL=single
        ;;
    nox)
        RUNLEVEL=2
        ;;
  esac
done

# Activate framebuffer display devices.
if [ $vmode ]; then
  if [ $boot = cdrom ]; then
    modprobe uvesafb scroll=ywrap mode_option=$vmode-16
  else for i in $(grep fb /tmp/pcimodules.txt); do
    case $i in
      atyfb)
        modprobe $i mode=$vmode-16
        ;;
      nvidiafb | rivafb)
        modprobe nvidiafb mode_option=$vmode bpp=16 hwcur=1
        ;;
      radeonfb | savagefb)
        modprobe $i mode_option=$vmode-16
        ;;
      sisfb)
        modprobe $i mode=$vmodex16 mem=12288 font=SUN12x22
        ;;
      viafb | vt8623fb)
        modprobe viafb viafb_mode=$vmode viafb_bpp=16
        ;;
      *)
        modprobe $i
        ;;
    esac
  done
    if grep -q i915 /tmp/pcimodules.txt; then true
    else [ -c /dev/fb0 ] || modprobe uvesafb scroll=ywrap mode_option=$vmode-16
    fi
  fi
fi

case $boot in
    cdrom)
        # Boot Linux from a live CD.
        loadmod ata_ ahci pdc_adma ^.hci-hcd
        modprobe usb-storage &&
        modprobe sr_mod &&
        sleep 7
        modprobe isofs
        mount -t iso9660 /dev/sr0 /media
        [ -d /media/isolinux -o -d /media/boot/isolinux ] ||
          mount -t iso9660 /dev/sr1 /media
        if [ -f /media/*.[Ss][Qq]* ]; then
          SQF=$(ls -t /media/*.[Ss][Qq]* | head -n 1)
          if [ $root = /dev/ram ]; then
               echo "Please wait until the RAM disk is ready."
               dd if=$SQF of=/dev/ram1 bs=2048 &&
               mount -t squashfs /dev/ram1 /opt
          else modprobe loop
               mount -t squashfs -o loop $SQF /opt
          fi
        else
          mount --move /media /opt
        fi
        union
        ;;
    loop)
        # Boot Linux from an image file.
        loadmod ata_ ahci pdc_adma ^.hci-hcd
        modprobe usb-storage &&
        modprobe sd_mod &&
        sleep 7
        mountr $root /media
        modprobe loop
        if [ -f /media/*.[Ss][Qq]* ]; then
          SQF=$(ls -t /media/*.[Ss][Qq]* | head -n 1)
          mount -t squashfs -o loop $SQF /opt
        elif [ -f /media/*.[Ii][Ss][Oo] ]; then
          ISO=$(ls -t /media/*.[Ii][Ss][Oo] | head -n 1)
          modprobe isofs
          mount -t iso9660 -o loop $ISO /opt
        fi
        union
        ;;
    ram)
        # Boot Linux from ramdisk.
        loadmod ata_ ahci pdc_adma ^.hci-hcd
        modprobe usb-storage &&
        modprobe sd_mod &&
        sleep 7
        mountr $root /media
        echo "Please wait until the RAM disk is ready."
        if [ -f /media/*.[Ss][Qq]* ]; then
          SQF=$(ls -t /media/*.[Ss][Qq]* | head -n 1)
          dd if=$SQF of=/dev/ram1 &&
          mount -t squashfs /dev/ram1 /opt
        elif [ -f /media/*.[Ii][Ss][Oo] ]; then
          ISO=$(ls -t /media/*.[Ii][Ss][Oo] | head -n 1)
          dd if=$ISO of=/dev/ram1 bs=2048 &&
          modprobe isofs
          mount -t iso9660 /dev/ram1 /opt
        fi
        union
        ;;
    usb*)
        # Boot Linux from a USB drive.
        loadmod ^.hci-hcd
        modprobe usb-storage &&
        modprobe sd_mod &&
        sleep 7
        mountr $root
        ;;
    ata*)
        loadmod ata_ ahci pdc_adma &&
        modprobe sd_mod &&
        mountr $root
        ;;
esac

# Make sure that init exists and is executable.
if [ -x /mnt/sbin/init ]; then
  mount --move /dev /mnt/dev
  mount --move /proc /mnt/proc
  mount --move /sys /mnt/sys
  umount /tmp

# Start init from the root filesystem.
  cd /mnt
  [ -f /media/updates.zip ] && unzip -o /media/updates.zip
  case $boot in
    cdrom)
      [ $root = /dev/ram ] && umount /media
      [ $RUNLEVEL ] || RUNLEVEL=3
      ;;
    loop | ram)
      umount /media
      [ $RUNLEVEL ] || RUNLEVEL=3
      ;;
    *)
      [ $RUNLEVEL ] || RUNLEVEL=5
      ;;
  esac
  [ -d initrd ] && pivot_root . initrd
  exec chroot . /sbin/init $RUNLEVEL
fi

# Start a shell as a last resort.
echo "Error booting from the root filesystem. Starting a shell."
exec /bin/dash
The following are examples of boot parameters that can be used with my init script.
- Boot Linux from the local hard drive partition /dev/sda8
boot=ata root=/dev/sda8
- Boot Linux from the latest squashfs file (*.sq*) on /dev/sda1
boot=loop root=/dev/sda1
- Boot Linux from the CD-ROM with 1024x768 video resolution
boot=cdrom vmode=1024x768
- Copy the squashfs image from CD-ROM into memory and run Linux on memory
boot=cdrom root=/dev/ram ramdisk_size=573440 vmode=800x600
- Boot Linux from the second partition of a USB drive
boot=usb root=/dev/sda2
Also read:
Labels:
bootstrap,
linux,
technology
Wednesday, September 26, 2012
Using UnionfsFuse on Debian/Ubuntu Linux
Unionfs-fuse is a user-space implementation of unionfs that makes it possible to run Linux over a read-only medium, such as CD-ROM. Unionfs-fuse is a convenient alternative to kernel implementations (unionfs, aufs and overlayfs), so users don't have to patch the kernel in order to try unionfs. There are many possible uses of unionfs:
- Create a live CD
- Run Linux from a read-only filesystem image, such as a squashfs file
- Freeze an existing Linux system and save all changes in the memory
Unionfs achieves all this by merging a read-only filesystem and a writeable filesystem into a single virtual filesystem and mount it at a certain mount point. Let's try and apply unionfs-fuse to the third situation above. Basically, we need to create an initramfs file containing unionfs-fuse and a custom init script. The basic procedure is like this:
- Load kernel drivers necessary to access the underlying storage device
- Mount the read-only filesystem image at /opt
- Mount tmpfs at /opt/tmp and create a directory /opt/tmp/.change
- Use unionfs-fuse to merge the two and mount it at /mnt
- Use chroot and start /sbin/init to boot the new unionfs filesystem
To carry about the above steps, an init script might look like this:
#!/bin/dash
# Use the small but functional dash to process this script

# Mount /proc, /sys, /dev and /dev/pts just in case
mount -t proc none /proc
mount -t sysfs none /sys
mount -t devtmpfs none /dev
mkdir -m 755 /dev/pts
mount -t devpts -o gid=5,mode=620 none /dev/pts

# Write commands here to load modules necessary to access a hard drive
modprobe pata_via
modprobe sd_mod

# Mount the Linux filesystem read-only at /opt
mount -r /dev/sda6 /opt

# Mount tmpfs at /opt/tmp
mount -t tmpfs none /opt/tmp
mkdir /opt/tmp/.change

# Create a unionfs mount at /mnt
modprobe fuse
unionfs-fuse -o allow_other,use_ino,suid,dev,nonempty,kernel_cache \
   -o cow,chroot=/opt,max_files=32768 /tmp/.change=RW:/=RO /mnt

# Make sure that init exists and is executable
if [ -x /mnt/sbin/init ]; then
  mount --move /dev /mnt/dev
  mount --move /proc /mnt/proc
  mount --move /sys /mnt/sys

# Start init from the root filesystem with runlevel 5.
  exec chroot /mnt /sbin/init 5
fi
The computer will boot into a virtual unionfs, consisting of writable tmpfs on top of read-only root filesystem. Make sure to modify /etc/rc.local so that it contains the following snippet of code.
for i in `ps ax | grep unionfs | grep -v grep | awk '{print $1}'`; do
  echo $i > /var/run/sendsigs.omit.d/unionfs.$i;
done
This prevents Linux from killing unionfs-fuse during shutdown so the system will properly shut down.
Related Posts
To Build Transmission-Daemon for Windows

Transmission is a free bittorrent application available on Linux. It is a pretty neat tool compared to other bittorrent software. It is possible to compile and use Transmission on Windows, thanks to Cygwin. First, install Cygwin using the Cygwin installer(setup.exe). I set the Root directory to C:\Cygwin and chose to install the following packages in addition to base packages.
- bison
- gettext-devel
- libtool
- make
- binutils
- gcc4-g++
- patch
- pkg-config
Compile zlib.
./configure --prefix=/usr --static
make
cp -iv zconf.h zlib.h /usr/include
cp -iv libz.a /usr/lib
Build OpenSSL.
./Configure -DHAVE_STRUCT_TIMESPEC -lz -lpthread threads zlib --prefix=/usr cygwin
make
make install
Build CURL.
./configure --prefix=/usr --disable-shared --with-ssl --with-ca-bundle=ca-bundle.crt
make
make install
Compile libevent.
./configure --prefix=/usr --disable-shared
make
make install
Lastly, build transmission.
./configure --prefix=/usr --disable-shared --enable-static --disable-nls --without-gtk CPPFLAGS=-DHAVE_STRUCT_TIMESPEC
make
make install
If you get snprintf error with libutp, insert the following line into utp.cpp:
extern int snprintf(char *, size_t, const char *, ...);
Labels:
bittorrent,
cygwin,
download,
open-source,
software
Saturday, September 22, 2012
To Compile UnionFS-fuse 0.26 on Debian Linux
I am trying to switch to unionfs-fuse for my live CD, but so far I haven't much success yet. Debian's unionfs-fuse package in Sid is outdated (version 0.24), so I compiled version 0.26. I had to install libfuse-dev in order to be able to build UnionFS-fuse. I probably needed cmake too, but I didn't choose to install cmake.
- cmake
- gcc
- libfuse-dev
- make
I edited Makefile to change PREFIX.
PREFIX=/usr
BINDIR=/bin
SBINDIR=/sbin
I just typed make to begin compilation.
make
make install
The following files are installed.
/usr/bin/unionfs
/usr/sbin/mount.unionfs
/usr/share/man/man8/unionfs-fuse.8
To make it compatible with Debian and derivatives, I renamed unionfs.
mv /usr/bin/unionfs /usr/bin/unionfs-fuse
Labels:
compile,
Debian,
linux,
open-source,
software
Thursday, September 20, 2012
Download Aria2 1.15.2

Here you can download my Windows builds of aria2. This is the result of my previous post on how to build aria2 for Windows.
I didn't expect my Windows build to depend on libstdc++-6.dll. I think that's because I used Cygwin's mingw64 compiler. It still works, though.
Aria2c Usage
aria2c --file-allocation=prealloc ftp://192.168.1.64/pardus.iso
If aria2 aborts a download due to a connection error, you can resume the download any time using aria2c like this:
aria2c -c ftp://192.168.1.64/pardus.iso
To download files from URL's written in a file urls.txt to a folder Downloads, run aria2 as follows. The urls.txt should contain one download per line with URL's seperated by a tab:
aria2c -i urls.txt -d Downloads
Subscribe to:
Posts (Atom)


