

Showing posts with label computer. Show all posts
Showing posts with label computer. Show all posts
Friday, December 14, 2012
System Mechanic 11.5 Professional Video Reviews
Labels:
advertising,
antivirus,
computer,
deal,
discount,
marketing,
performance,
promotion,
sale,
software


Monday, October 8, 2012
Linux: Building X.org Kdrive Server Xfbdev on Debian Wheezy
Kdrive is a minimal X11 server that runs as a single executable with little dependencies. I use Kdrive for my Web-only/Rescue Linux systems. Before compiling Kdrive, I installed the following packages on my box running Debian Sid — which will be eventually rolled into Wheezy release:
- bison
- g++-4.7
- libexpat1-dev
- libpciaccess-dev
- libpixman-1-dev
- libssl-dev
- libudev-dev
- libxdamage-dev
- libxfont-dev
- libxi-dev
- libxkbfile-dev
- libxmu-dev
- libxxf86vm-dev
- make
- pkg-config
- x11proto-bigreqs-dev
- x11proto-composite-dev
- x11proto-randr-dev
- x11proto-render-dev
- x11proto-resource-dev
- x11proto-scrnsaver-dev
- x11proto-video-dev
- x11proto-xcmisc-dev
- x11proto-xf86dga-dev
- x11proto-xinerama-dev
- xkb-data
Installing X Protocol Headers
The current RandR protocol headers from Debian didn't meet the required version, so I had to download the latest one from freedesktop.org. I installed randrproto like this.
tar xjvf randrproto-1.4.0.tar.bz2
cd randrproto-1.4.0
./configure --prefix=/usr
make install
Compiling Xfbdev
I got the latest X.org release from freedesktop.org. The following commands will build Xfbdev:
tar xjf xorg-server_1.13.0.tar.bz2
cd xorg-server-1.13.0/
./configure --prefix=/usr --disable-xorg --enable-kdrive --enable-kdrive-evdev --enable-config-udev --disable-aiglx --disable-glx --disable-dri --disable-dri2 --disable-drm --disable-record --with-xkb-path=/usr/share/X11/xkb --with-xkb-output=/var/lib/xkb --with-xkb-bin-directory=/usr/bin --with-default-xkb-rules=xorg --with-default-xkb-model=pc105 --with-default-xkb-layout=us
make
make install
Installed Files
The following files are installed after successfully building a Kdrive server.
/usr/bin/Xfbdev
/usr/bin/Xnest
/usr/bin/Xvfb
/usr/lib/xorg/protocol.txt
/usr/share/man/man1/Xnest.1
/usr/share/man/man1/Xserver.1
/usr/share/man/man1/Xvfb.1
/var/lib/xkb/README.compiled
To Use Xfbdev
An executable file Xfbdev will be created in /usr/bin. To be able to use the Xfbdev server, framebuffer video must be enabled either in the kernel or as a module. If CONFIG_FB_VESA option was enabled in the kernel, you can use the syslinux bootloader in the following way to boot Linux into a framebuffer video mode:
LABEL minimal
KERNEL vmlinuz-2.6.31.5
INITRD initramfs.lzma
APPEND vga=0x314 video=vesafb:mtrr
Once the framebuffer video has been activated, Xfbdev can be started in the following way:
Xfbdev :0 vt7 dpms -ac -br +bs -dpi 96 -mouse evdev,5,device=/dev/input/event2 -2button -keybd evdev,,device=/dev/input/event3 -fp /usr/local/share/fonts,/usr/share/fonts/X11/Type1,/usr/share/fonts/truetype/ttf-dejavu -nolisten TCP
Download my X.org build 1.13.0

Here you can obtain my compiled binaries Xfbdev, Xnest and Xvfb:
Also Read:
Thursday, October 4, 2012
Disk Cloning / Imaging over Network with SSH, Netcat, DD and XZ
Today we have affordable, ample storage and faster bandwidth to facilitate partition imaging and disk cloning over network. Nowadays, it's common and feasible to take the image of a whole partition for various reasons. Compared to file-based backups using tar, disk imaging provides the following advantages.
- The boot sector is preserved so that it's easy to make it bootable after the restore.
- Information such as UUID and LABEL is presered, which helps identify the partition in booting and mounting.
- Information such as ACL and XATTR is preserved, which helps restrict file access and secure the system.
- Every bit in the unused sectors is preserved, which may assist in digital forensics to uncover deleted or hidden information.
There are commercial programs for disk imaging and backup (Norton Ghost, Acronis True Image). However, Linux users can use readily available tools to get things done. For disk cloning/imaging, we can use ssh, netcat, dd and xz. Note that dd will fail on physically damaged disks. For such disks, use ddrescue instead.
For security and compression, we are going to use ssh and xz in this tutorial. If you don't like xz, feel free to substitute xz with gzip, bzip2 or lzop. Also, netcat is used to stream the dd output over the network. On Debian and Ubuntu derivatives, you need the following packages.
- bzip2, gzip, lzop, lzma OR xz-utils
- dd
- netcat
- ssh
We are making these assumptions in the following scenarios.
- Sending computer S
This computer has IP address 192.168.1.1 and needs to back up partition /dev/sda1. - Sending Port
We'll send using port 5525. - Receiving computer T
This computer has IP address 192.168.1.2 and needs to restore partition /dev/sda2. - Receiving Port
We'll receive at port 7749.
Disk Cloning using dd, xz, netcat and ssh
In this scenario, we will clone a disk partition, simultaneously sending an image of the source partition /dev/sda1 from computer S (192.168.1.1) and restoring it at /dev/sda2 on computer T (192.168.1.2). Make sure that the source partition is not mounted or is mounted read-only. Also, make sure that the target partition size is greater than or equal to the source partition size.
- At the sending computer, compress the source partition /dev/sda1 with xz and set up netcat to send it at port 5525:
dd if=/dev/sda1 bs=16M | xz | nc -l 5525
- At the receiving computer, set up a SSH tunnel to the sending computer (192.168.1.1):
ssh -f -N -L 7749:127.0.0.1:5525 username@192.168.1.1
- At the receiving computer, type the following command to receive the partition image and restore it at /dev/sda2:
nc 127.0.0.1 7749 | xz -d | dd of=/dev/sda2 bs=16M
Alternatively, we could take the following steps to achieve the same thing. However, we start at the receiving computer.
- At the receiving computer with the target partition /dev/sda2, type the following command to receive the partition image:
nc -l 7749 | xz -d | dd of=/dev/sda2 bs=16M
- At the sending computer with the source partition /dev/sda1, set up a SSH tunnel to the receiving computer (192.168.1.2):
ssh -f -N -L 5525:127.0.0.1:7749 username@192.168.1.2
- At the sending computer, type the following command to compress the source partition /dev/sda1 and transmit it over the SSH tunnel:
dd if=/dev/sda1 bs=16M | xz | nc 127.0.0.1 5525
Note that the transfer may take many hours for a large partition.
Disk Imaging using dd, xz, netcat and ssh
In this scenario, we will just send an image of the source partition /dev/sda1 to the receiving computer T (192.168.1.2) without restoring it. Make sure that the source partition is not mounted or is mounted read-only. A question remains whether to compress the image at the sending or receiving computer. The answer depends on which computer is more powerful. For this example, we'll compress at the sending computer (for network bandwidth reason).
- At the sending computer, compress the source partition /dev/sda1 with xz and stream it using netcat:
dd if=/dev/sda1 bs=16M | xz | nc -l 5525
- At the receiving computer, set up a SSH tunnel to the sending computer (192.168.1.1):
ssh -f -N -L 7749:127.0.0.1:5525 username@192.168.1.1
- At the receiving computer, type the following command to receive the file:
nc 127.0.0.1 7749 > partimg.xz
Alternatively, we could take the following steps to achieve the same thing.
- At the receiving computer, set up netcat to listen at port 7749 and save the incoming data to a file partimg.xz.
nc -l 7749 | dd of=partimg.xz bs=16M
- At the sending computer, establish a SSH tunnel to the receiving computer (192.168.1.2) first:
ssh -f -N -L 5525:192.168.1.2:7749 username@192.168.1.2
- At the sending computer, type the following command to compress the source partition /dev/sda1 and transmit it over the SSH tunnel:
dd if=/dev/sda1 bs=16M | xz | nc 127.0.0.1 5525
Note that the transfer may take many hours for a large partiiton.
Alternative Simple Commands for Disk Cloning / Imaging
I don't like these methods for some reason, but here I show the simpler methods where netcat is not needed. For disk cloning, type something like this:
dd if=/dev/sda1 bs=16M | xz | ssh username@192.168.1.2 "xz -d | dd of=/dev/sda2 bs=16M"
Just to send an image file, run a command as follows:
dd if=/dev/sda1 bs=16M | xz | ssh username@192.168.1.2 "dd of=partimg.xz bs=16M"
Also Read:
Labels:
administration,
backup,
computer,
linux,
technology,
unix
Saturday, August 21, 2010
Debian Linux: Simple steps to recover files from /lost+found
The following steps illustrate how one can use simple shell commands to recover files from the /lost+found directory in Linux. This assumes that you actually have some files in /lost+found.
First, concatenate all the *.md5sums files in /var/lib/dpkg/info into a single file:
cd /var/lib/dpkg/info
cat *.md5sums | sort -k 2 > /tmp/all.md5
Go to the /lost+found directory. fsck may have placed some files here after fixing the Linux partition. If you don't find any file here, you can relax and skip the following steps. Run md5sum on files in /lost+found.
cd /lost+found
md5sum * | sort > /tmp/lost.md5
Put only the md5sum values into a temporary file, called 0.txt.
awk '{print $1}' /tmp/lost.md5 > /tmp/0.txtSearch all.md5 for the md5sum values in 0.txt and save the results in 1.txt.
for f in $(cat /tmp/0.txt); do grep $f all.md5 >> /tmp/1.txt; done
Put the names of files in /lost+found into a temporary fie 2.txt.
awk '{print $2}' /tmp/lost.md5 > /tmp/2.txtMove the lost+found files to their original locations.
cd /
for $f in $(cat /tmp/2.txt); do MD5=$(grep $f /dev/shm/lost.md5 | awk '{print $1}'); ORIGIN=$(grep $MD5 /tmp/1.txt | awk '{print $2}'); mv /lost+found/$f /$ORIGIN; done
Labels:
computer,
Debian,
filesystem,
linux,
recovery,
repair,
trouble-shooting,
Ubuntu
Wednesday, July 28, 2010
Checking Integrity of A Debian/Ubuntu System
Sometimes, a Linux filesystem becomes corrupted, system files are damaged, or some crucial files get lost. This often happens, regardless of which filesystem (ext2, ext3, ext4, jfs, reiserfs, reiser4, or xfs) is used. There are many possible reasons, such as:
- Unstable hardware, for example, memory or hard drive problem
- Overheat, power surge, quake or another environmental disaster
- Buggy software, such as a bug in the kernel or the filesystem driver
- Compromised security, for example, network intrusion or attack
- Worm or virus infection
Files in Linux systems can be categorized into the following three:
- Verifiable System Files
In Linux systems that are managed by packages (such as Debian and Ubuntu), these files are installed by packages and make up the bulk of the filesystem. These files reside in such directories as /bin, /lib, /sbin and /usr. They are usually static, which means they don't normally change except when the system is updated, or locally compiled binaries are installed. - Changeable System Files
These files are auxiliary system files for system configuration, initialization or customization, and system data (such as logs and cache). They reside in /boot, /etc, /opt, /srv and /var. - User Data
These files are created and used by superuser (a.k.a root) and normal users, or software-generated during casual user activities. Typically, they are in /home, /media, /mnt and /root.
This post focuses on verifiable system files (installed by packages). When the filesystem becomes corrupted (but not completely unreadable), it is possible to verify and restore the system integrity by using package checksums. Before you continue, make sure to fsck the filesystem.
e2fsck -r -v /dev/sda7
In this example, /dev/sda7 points to an ext2 partition we're going to check. Be aware that you cannot fsck a mounted filesystem. Therefore, boot with a Debian Live CD (or a Ubuntu CD) and run fsck. After you've performed fsck, there may be some files created in the /lost+found directory. We'll deal with them later. First, mount the filesystem.
mount -t ext2 /dev/sda7 /mnt
Go to /var/lib/dpkg/info. Then, concatenate all the md5sums files. Most, if not all, Debian and Ubuntu packages come with a md5sum file that we can use to check the integrity of the package and the files installed by the package.
cd /var/lib/dpkg/info
cat *.md5sums | sort > /dev/shm/all.md5
all.md5 has md5 checksums of all the files installed on the system. Now, check the files on the Debian/Ubuntu system against the concatenated md5sums file.
cd /
md5sum -c /dev/shm/all.md5 > /dev/shm/check.txt 2>&1
/dev/shm/check.txt now contains the results of the integrity check. It looks like this:
bin/bash: OK
bin/bunzip2: OK
bin/bzcat: FAILED
In this example, /bin/bzcat is damaged. To find all the missing or damaged files, use a command like this one:
grep -v ': OK$' /dev/shm/check.txt
Let's reinstall this file. First, find out which package this file belongs to.
dpkg -S /bin/bzcat
We'll see the following result.
bzip2: /bin/bzcat
Now we know that we need to reinstall bzip2. Let's download the package.
dpkg -p bzip2 | grep 'Filename: '
This command will let us know the name of the package to download. Use wget to download it.
wget ftp://ftp.us.debian.org/debian/pool/main/b/bzip2/bzip2_1.0.5-4_i386.deb
You can just reinstall the package.
dpkg -i bzip2_1.0.5-4_i386.deb
Or, you can just extract one file:
dpkg --fsys-tarfile bzip2_1.0.5-4_i386.deb | tar xf - ./bin/bzcat
Alternatively,
dpkg --fsys-tarfile bzip2_1.0.5-4_i386.deb | tar xOf - ./bin/bzcat > /mnt/bin/bzcat
To restore a file from the /lost+found directory, you can also use the MD5SUMS file. First, run md5sum on files in /lost+found.
cd /lost+found
md5sum *
You may get an output like this.
9aaa2176d20c1b1203e3abbac55a2513 #124531
To find out what #124531 file is originally, find its md5 checksum from the all.md5 file above.
grep 9aaa /dev/shm/all.md5
You'll get a result like this.
9aaa2176d20c1b1203e3abbac55a2513 bin/bzip2
Now you can just move it to its place.
mv \#124531 /mnt/bin/bzip2
After you restore all damaged files and restore files from /lost+found, you can find missing files in the system. Go to /var/lib/dpkg/info again and concatenate all the list files.
cd /var/lib/dpkg/info
cat *.list | sort | uniq > /dev/shm/all.txt
The .list files in the /var/lib/dpkg/info directore show the list of files installed by packages. Let's find what's missing from the system.
cd /
for f in $(cat /dev/shm/all.txt ); do test -e "$f" || echo "$f" >> /dev/shm/nonexist.txt ; done
The file /dev/shm/nonexist.txt will show which files are missing from the system. You can then replace the missing files as done previously.
Labels:
administration,
computer,
Debian,
filesystem,
linux,
maintenance,
repair,
Ubuntu,
unix
Monday, July 26, 2010
Linux: Using dd To Back Up Hard Drive Partitions
I am going to use the omnipresent and omnipotent tool called dd to back up a hard drive partition. I am working with the drive /dev/sdb. First, I save a text file that has information on the partition table layout.
fdisk -l /dev/sdb > hdpt.txt
fdisk -l -u /dev/sdb >> hdpt.txt
Then, I choose the compression format to use for the backup archive.
- gzip
- bzip2
- lzma
- xz
My choice for the compression format is lzma which provides superior compression and faster decompression. The following command backs up a partition at /dev/sdb1 with dd and lzma.
dd if=/dev/sdb1 | lzma -9c > backup01.bin.lzma
To restore this backup later, use the following command:
lzcat backup01.bin.lzma | dd of=/dev/sdb1
Labels:
administration,
backup,
command,
computer,
hard drive,
linux,
partition
Monday, April 6, 2009
OEM SLIC tables for Windows Vista
I was researching the activation scheme behind Windows Vista OEM computers. Computers with pre-installed Windows Vista have a special license embedded in their ACPI BIOS, called SLIC table. This kind of a hardware-based activation scheme was designed to prevent software piracy. Nonetheless, there's a way to create a SLIC table in the BIOS with the help of software. This method is sometimes called SoftMod or just Vista Loader.
Using the SoftMod method, one can insert the SLIC signature of a certain hardware manufacturer into the BIOS and apply a copy of a license file (*.xrm-ms), then have Windows Vista activated. The first SLIC code that was leaked widely belongs to the (infamous) ASUS notebook manufacturer. After ASUS, more and more SLIC codes have been discovered and exploited.
Obviously, using a SLIC code that's spread and used widely makes it vulnerable to Windows updates that are designed to defeat circumventive measures against software activation. Therefore, uncommon SLIC signatures are better than the common ones. Vista Loader 3.0.0.1 includes OEM BIOS emulation codes of the following vendors:
- AMD
- AMD64
- Acer
- Asus
- COMPAQ
- Dell
- Emachines
- Fujitsu-Siemens
- Gateway
- Hewlett-Packard
- Intel
- Levono
- Medion
- NEC
- Packard Bell
- Samsung
- Sony
- Toshiba
Among these vendors, MEDION seems to be the most obscure one. Anyway, I found more vendor SLIC codes by downloading AMI_SLIC3_20080419.rar.
Saturday, April 4, 2009
Fixing a Vista Boot Problem
Error: Press Ctrl+Alt+Del to restart
I restored a partimage backup of Windows Vista. The backup was originally made from the partition /dev/sda2, but I deleted /dev/sda1 and created a new partition at /dev/sda1 with the same size as the backed-up partition. Then I restored the backup on /dev/sda1.
Upon reboot, Windows Vista couldn't start. Instead I received an error:
A disk error occurred.
Press Ctrl+Alt+Del to restart.
After many attempts, I finally fixed the problem. Here I show how I did it:
- Put your Vista installation DVD into your DVD drive and restart your computer. When you see the message "Press a key to boot from DVD", press any key.
- When the Install Windows screen appears, click Repair your computer.
- You may see Vista automatically trying to detect a boot problem and fix it. When a boot problem is detected, you'll get a dialog with a choice to fix the problem or ignore it. Just cancel and close the dialog.
- You'll be shown a window with many repair options. Open a command prompt.
- Type the following commands. It is assumed that Windows is installed in C: Replace C: with the correct letter if it's different:
chkdsk C: /f
C:
bootrec /FixMBR
bootrec /FixBoot
bootrec /ScanOs
attrib -r -s -h c:\boot\bcd
del c:\boot\bcd
bootrec /rebuildbcd - Restart your computer and see if Vista can start.
Error: Winload.exe is missing or corrupt
Windows failed to start. A recent hardware or software change might be the cause. To fix the problem:
1. Install your WIndows installation disk and reboot.
2. Choose your language settings, click Next
3. Choose "Repair your computer"

File: \Windows\system32\winload.exe
Status: 0xc0000225
Info: The selected entry could not be loaded because the application is missing or corrupted
This problem occurs when the UUID of the NTFS partition is changed after resizing or moving the Windows partition with GParted or Acronis Disk Director. This problem can be easily fixed if you have a Windows install DVD. Put the Windows install DVD in your CD-ROM and Reboot your computer. Select “Repair your computer” and cancel Automatic Repair. Open a Command Prompt and type the following commands:
C:
bcdedit /enum /store C:\Boot\BCD
bcdedit /store C:\Boot\BCD /set {bootmgr} device partition=C:
bcdedit /store C:\Boot\BCD /set {default} device partition=C:
bcdedit /store C:\Boot\BCD /set {default} osdevice partition=C:
Saturday, March 28, 2009
Cleaning Up Windows Vista
This post will eventually be a collection of tips on cleaning up and trimming Windows Vista.
Emptying the Recycle Bin
Emptying the recycle bin is the easiest and most common way for people to clean up Windows. Even if you don't, Windows will automatically remove the oldest trash from the recycle bin when it fills up.
Deleting Temporary Files
As you use your computer, Windows and applications save temporary files in the folder dedicated for temporary storage. These temporary folders are given the variable name %TEMP% or %TMP% — in most cases, %TEMP% and %TMP% are identical. Ideally, applications are supposed to remove temporary files after they finish their jobs, but sometimes they forget to remove temporary files. Thus, once in a while, you have to remove temporary files yourself.
To remove temporary files, follow the following steps:
- Open the Explorer — the default file browser in Windows. You can do so by opening My Computer, My Document, My Pictures or My Music.
- Type in the address bar
%TEMP%and pressEnter. - You'll be taken to the temporary folder, typically
C:\Users\YourName\AppData\Local\Temp. Remove any temporary files and folders existing inside that folder. - If %TEMP% and %TMP% are different, also do the same for %TMP% folder.

Cleaning Up VirtualStore
With strict User Access Control (UAC) in effect, Vista places user-generated files in the VirtualStore folder when a program wants to save something in the restricted area of filesystem. Type %APPDATA% in the address bar of the Windows explorer. Then, descend to Local/VirtualStore. Note that not everything there should be deleted as some of them are user settings.
Deleting Windows Updates
Windows updates are necessary to make Windows Vista secure and efficient. However, after updating Windows, some update files are left over and take extra space. The following steps delete these left-over update files.
- Open the Start menu, right-click Computer and select Manage.
- In the left pane, expand Service and Applications and select Services.
- In the right pane, select Windows update service and stop the serive.
- Open Computer in the explorer and go to C:\Windows\SoftwareDistribution
- Go to the DataStore folder and delete all files and folders there.
- Go back and change to the Download folders. Remove all files and folders there.
- Restart the Windows Update service.
Friday, January 2, 2009
Project Directive: Building an Industrial PC
Project Directive
This directive outlines the purpose and requirements of the computer to be built in the near future.
Purpose of the Product
The machine will serve various purposes as stated below.
- Internet Gateway: The machine will be running almost always with constant wired or wireless connection to the Internet. The machine will have a gateway capability to connect other machines to the Internet via an Ethernet switch or wireless connection.
- Network Server: The machine will store and serve files (ex. pictures, music, movies, etc.) to clients both on private network and the Internet. However, the served files shall be stored and retrieved from an external storage device connected via USB, Firewire or eSATA.
- Internet Entertainment: The machine may be casually used to browse the Internet, hang out in social networks, read news, check Web mail and engage in text/voice/video conversation with others on the Internet.
- Multimedia Player: The machine will be able to play music, Internet radio and movies on stereo system, TV or monitor. It may be optionally controlled by a remote controller, wireless keyboard or mouse.
- Time-consuming Computations: The machine will optionally perform various computational tasks such as compilation of executable codes, encryption, decryption, statistical analysis and conversion of data.
Hardware Requirements
The machine shall occupy minimal space, and operate quietly and energy-efficiently.
- Its circuit board will be in Pico-ITX (100x72mm), Nano-ITX (120x120mm), Mini-ITX (170x170mm), or similarly compact form.
- The CPU will be Mobile AMD Sempron, VIA Nano or Intel Atom. In order to maintain quiet operation, it is recommended that the CPU have no fan attached.
- At least 256MB of volatile memory is required. SODIMM-type memory is recommended.
- Non-volatile memory will take the form of compact flash, Solid-State Drive or 2.5 inch hard drive. At least 256MB of non-volatile memory is required. Additional storage will be attached externally through USB, Firewire or eSATA ports.
- The machine will have a minimum number of external connectors such as one PS/2, VGA, S-Video, audio in/out, LAN and at least 2 USB ports. No serial or parallel port is required.
- The machine will contain no floppy or CD-ROM drive.
Software Requirements
The primary operating system will be Linux. Optionally, Windows XP or Windows Vista will be installed as a dual-boot option.
- The non-volatile memory storage in the system will store a functional boot loader that can boot the system from internal storage, external storage attached via USB/Firewire/eSATA, or network storage via BOOTP/TFTP.
- It is optional but recommended for the internal storage to contain a functional Linux operating system that meets the project purposes stated above. No private user-specific information shall be stored. For stability and data integrity, it is also recommended to write-protect the operating system and disable modification for a long period of time. Periodically (monthly, quarterly, every 4 months, or semianually), the whole operating system will be unlocked, updated with newer versions, and optimized with new settings.
- If Windows operating system is to be used, it will be installed on a USB hard drive and started by the boot loader.
- All variable/extraneous settings and data will be stored externally on a USB flash or USB hard drive.
- The machine should allow remote logins by local computers via SSH, HTTP, VNC or Remote Desktop sessions.
Candidate Parts
- Asus Eee Box
- HP Compaq t5730 Thin Client - KD219AT#ABA
- VIA ARTiGO Builder Kit inspired by Pico ITX with 1GB SODIMM Memory Free!
- ECS PMI8M (2.0) Motherboard CPU Bundle - Intel Socket 479, Mini-ITX, Intel 852GM Chipset, Intel Celeron M 1Ghz Processor On-Board
- Mini Itx Via CN700 8237R+ DDR2 by MSI
- SolidLogic T-3310 Mini-ITX System
- Jetway J7F2WE1G2E
Monday, December 29, 2008
Backing up Hard Disk Partitions in Linux
To guard against disasterous hard disk failure or data loss, regular backup is very important. For Windows users, there's Norton Ghost which helps back up valuable data and settings in your hard disk. But for thrifty and savvy users, there's a nifty Linux tool called partimage. It's a simple console program but does its job great.
This tutorial guides you in backing up hard disk partitions in Linux. Let's assume you want to back up your Windows partition to a USB drive using partimage. If you are a Linux user, install partimage.
Otherwise, you can download and burn a System Rescue CD and boot with it. Connect your USB hard drive to your computer and mount it. If your USB drive has a FAT32 partition on /dev/sdb1, then the following command will mount it on /mnt:
mount -t vfat -o gid=100,dmask=2,fmask=113,shortname=winnt /dev/sdb1 /mnt
Make a folder called Backup and change to it:
cd /mnt
mkdir Backup
cd Backup
Save the partition table of your hard drive to a text file, assuming your hard drive is /dev/sda:
fdisk -l -u /dev/sda > hdptbl01.txt
Backing up with partclone
partclone is a new Linux tool for backing up and restoring hard disk partitions. The following command illustrates a situation where I back up the second partition, compress it on the fly and save the backup in 695M chunks.
partclone.ntfs -c -s /dev/sda2 | bzip2 -c | (cd /mnt/sdb1/Backup; split -d -b 695M - Backup-$(date +%F).partclone.bz2.)
Alternatively, you can use lzma to compress the backup.
partclone.ntfs -c -s /dev/sda2 | lzma -9c > Backup-$(date +%F).partclone.lzma
For quick backup, use lzop:
partclone.ntfs -c -s /dev/sda2 | lzop -c > backup-$(date +%F).partclone.lzo
Restoring Backups with Partclone
Here's a sample command:
cat Backup-2012-05-27.partclone.bz2.* | bzip2 -dc - | partclone.ntfs -r -o /dev/sda2
Backing up with Partimage
Assuming the partition to back up is /dev/sda1, the following command will back up /dev/sda1 in chunks of 695 MB so you can burn each piece on CD conveniently.
partimage -V 695 save /dev/sda1 backup01.pim
You'll be shown a number of options as seen below so you can tweak some settings. For example, if you want your computer to automatically power off after partimage finishes backup, check the Halt option. Press F5 to continue.

Next, you will be given an option to enter description of the backup.

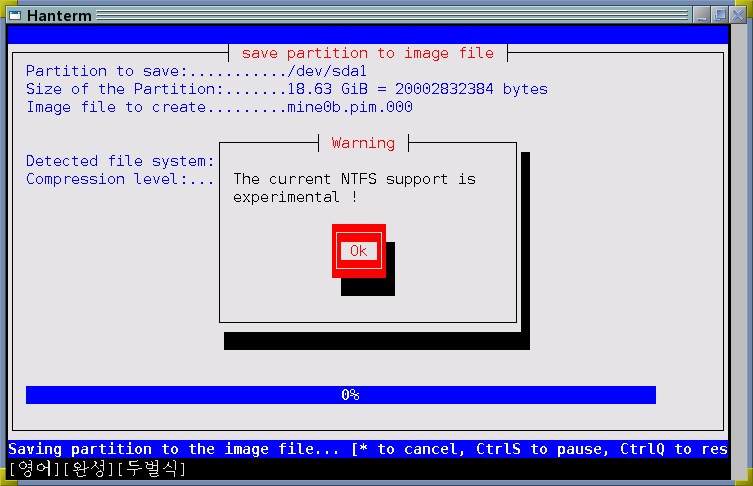
If the partition you're backing up is an NTFS partition (as most Windows partitions are), you'll be given the warning "The current NTFS support is experimental !". You can safely ignore it for now.
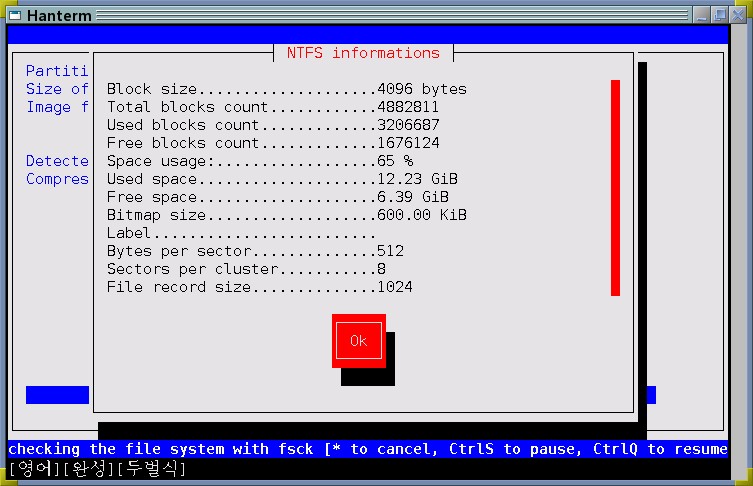
Next, you'll be shown NTFS information about the backup partition.
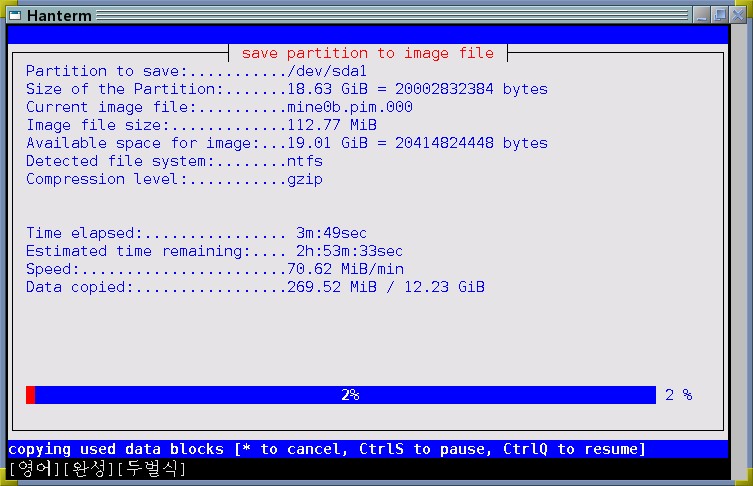
After that, partimage will start backing up as per instruction. A handful progress window will appear with the time remaining and progress in percentage.
Restoring Partitions with Partimage
When something goes wrong with your computer, you can restore your hard disk partitions with the backup you've made with Partimage. First, make sure that you have a partition whose size is exactly the same as the partition the backup is made from. You can compare the current partition table with the contents of hdptbl01.txt file we've made earlier.
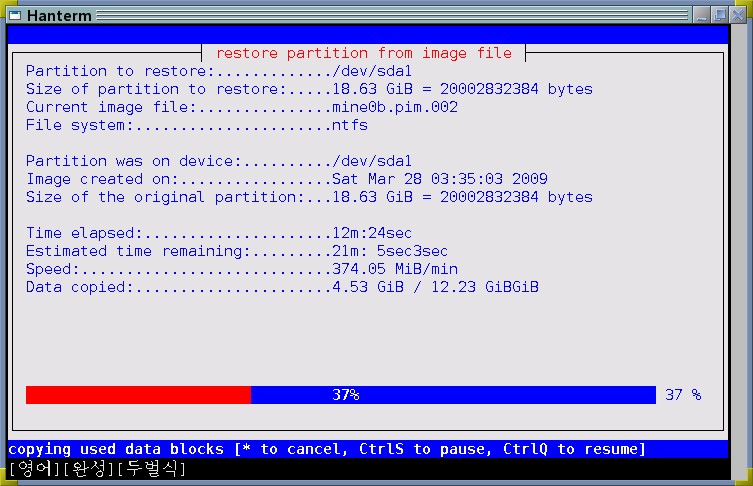
To restore the partition /dev/sda1 from a series of backup files starting with backup01.pim.000, open a console and type the following command:
partimage restore /dev/sda1 backup01.pim.000
Checking the Integrity of Partimage Backups
If you want to check partimage backups for integrity, specify the simulate option either on the command line or in the dialog, for example:
partimage --simulate restore /dev/sda1 backup01.pim.000
Related Posts
Subscribe to:
Posts (Atom)


